Configure SAML with Okta
If you use Okta as your SAML identity provider (IdP), you can use the information in this topic to set up SAML authentication for your Tableau Cloud site. You can also use the How to Configure SAML 2.0 for Tableau Cloud(Link opens in a new window) topic in the Okta documentation.
Tableau Cloud’s SAML integration with Okta supports service provider (SP)-initiated SSO, identity provider (IdP)-initiated SSO, and single logout (SLO).
Notes:
- These steps reflect a third-party application and are subject to change without our knowledge. If the steps described here do not match the screens you see in your IdP account, you can use the general
- Beginning February 2022, multi-factor authentication (MFA) through your SAML SSO identity provider (IdP) is a Tableau Cloud requirement.
Step 1: Open the Tableau Cloud SAML settings
To configure the Okta application, you will need to use information in the Tableau Cloud SAML settings.
-
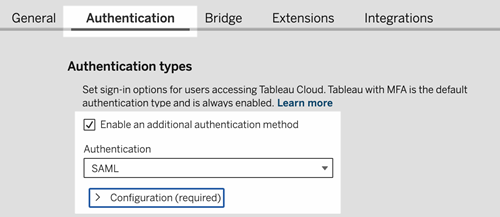
Sign in to your Tableau Cloud site as a site administrator, and select Settings > Authentication.
-
On the Authentication tab, select the Enable an additional authentication method check box, select SAML, and then click Configuration (required) drop-down arrow.
Step 2: Add Tableau Cloud to your Okta applications
The steps described in this section are performed in the Okta administrator console.
-
Open a new browser and sign in to your Okta administrator console.
-
From the left pane, select Applications > Applications and click the Browse App Catalog button.
-
Search for and click "Tableau Cloud" and then click the Add Integration button. This opens the General Settings tab.
-
(Optional) If you have more than one Tableau Cloud site, edit the site name in the Application label field to help you differentiate between your Tableau Cloud application instances.
Step 3: Configure SAML
The steps described in this section are performed in both the Okta administrator console and the Tableau Cloud’s SAML configuration settings.
-
In the Okta administrator console, click the Assignments tab to add your users or groups.
-
When finished, click Done.
-
Click the Sign On tab and in the Settings section, click Edit.
-
(Optional) If you want to enable single logout (SLO), do the following:
-
Select the Enable Single Logout check box.
-
Copy the "Single Logout URL" value from the Tableau Cloud metadata file. For example, <md:SingleLogoutService Binding="urn:oasis:names:tc:SAML:2.0:bindings:HTTP-POST" Location="https://xxxx/public/sp/SLO/xxxxxxxx-xxxx-xxxx-xxxx-xxxxxxxxxxxx"/>. For more information, see the Configure Single Logout Using SAML with Okta(Link opens in a new window) in the Tableau Knowledge Base.
-
In the Advanced Sign-on Settings text box, enter the value you copied in step b.
-
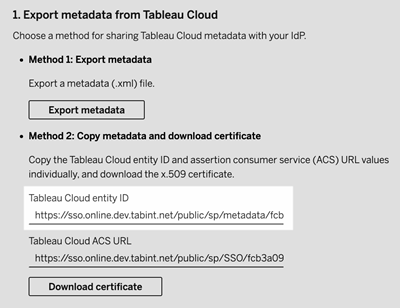
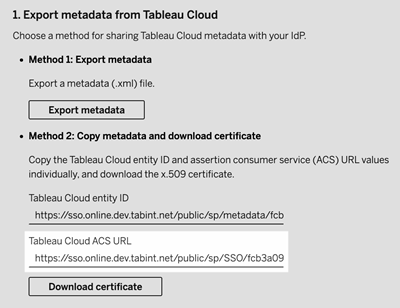
Back in the Tableau Cloud SAML configuration settings, under 1. Export metadata from Tableau Cloud, click the Download Certificate button.
-
Return to the Okta administrator console, next to Signature Certificate, click the Browse button and navigate to the file you downloaded in step d.
-
Select the file and click the Upload button.
-
When finished, click Save.
-
-
Return to the Tableau Cloud SAML configuration settings, under step 1, Method 2: Copy metadata and download certificate, copy the Tableau Cloud entity ID.
-
Return to the Okta administrator console and do the following:
-
Select Applications > Applications, click the Tableau Cloud application, and then select the Sign On tab.
-
Click Edit.
-
Under Advanced Sign-on Settings, in the Tableau Cloud entity ID text box, paste the URL.
-
Repeat steps 7 and 8 for the Tableau Cloud ACS URL.
Note: The Tableau Cloud SAML configuration settings appear in a different order than on the Okta settings page. To prevent SAML authentication issues, make sure that the Tableau Cloud entity ID and Tableau Cloud ACS URL are entered into the correct fields in Okta.
-
When finished, click Save.
-
-
Back in the Tableau Cloud SAML configuration settings, under step 1, Method 2: Copy metadata and download certificate, click the Download Certificate button.
-
Return to the Tableau Cloud application in the Okta administrator console, on the Sign On tab, click Edit, and do the following:
-
Under Metadata details, copy the Metadata URL.
-
Paste the URL into a new browser and save the results as a file using the default "metadata.xml".
-
-
Back in the Tableau Cloud SAML configuration settings, under 4. Upload metadata to Tableau Cloud, click the Choose a file button, select the metadata.xml file to upload the file. This automatically fills the IdP entity ID and SSO Service URL values.
-
Map the attribute names (assertions) in the Tableau Cloud User Profile Mappings page to the corresponding attribute names under 5. Match attributes in the Tableau Cloud SAML configuration settings.
-
Under 7. Test configuration, click the Test Configuration button. We highly recommend that you test the SAML configuration to avoid any locked out scenarios. Testing the configuration helps ensure that you have configured SAML correctly before changing the authentication type of your users to SAML. To test the configuration successfully, make sure that there is at least one user who you can sign in as who is already provisioned in the IdP and added to your Tableau Cloud with SAML authentication type configured.
Note: If the connection fails, consider keeping theNameIDattribute in Tableau as-is.
Step 4: Add users to the SAML-enabled Tableau site
If you plan to use SCIM to provision your users from Okta, do not manually add your users to Tableau Cloud. For more information, see Configure Configure SCIM with Okta. If you are not using SCIM, then use the steps below to add users to your site.
The steps described in this section are performed on the Tableau Cloud’s Users page.
-
After you complete Step 3: Configure SAML, return to your Tableau Cloud site.
-
From the left pane, navigate to the Users page.
-
Follow the procedure described in Add Users to a Site topic.
Step 5: Enable iFrame embedding (optional)
When you enable SAML on your site, you need to specify how users sign in to access views embedded in web pages. These steps configure Okta to allow authentication using an inline frame (iFrame) for embedded visualization. Inline frame embedding may provide a more seamless user experience when signing on to view embedded visualizations. For example, if a user is already authenticated with your identity provider and iFrame embedding is enabled, the user would seamlessly authenticate with Tableau Cloud when browsing to pages that contain embedded visualizations.
Caution: IFrame can be vulnerable to a clickjack attack. Clickjacking is a type of attack against web pages in which the attacker tries to lure users into clicking or entering content by displaying the page to attack in a transparent layer over an unrelated page. In the context of Tableau Cloud, an attacker might try to use a clickjack attack to capture user credentials or to get an authenticated user to change settings. For more information about clickjack attacks, see Clickjacking(Link opens in a new window) on the Open Web Application Security Project website.
-
Sign in to your Okta administrator console.
-
From the left pane, select Customizations > Other and navigate to the IFrame Embedding section.
-
Click Edit, select the Allow iFrame embedding check box, and then click Save.