Install and Configure Additional Nodes
After you install Tableau Server on one computer (or node), the server is functional and ready for use, but it has no redundancy. If there is a problem with a process or a problem with the computer itself, Tableau Server may be unavailable. In addition, all processes are running on a single computer, so there can be contention for resources on that computer.
You can extend your Tableau Server installation by adding Tableau to additional nodes, creating a distributed installation. This article describes the general steps for installing Tableau Server on additional nodes and assumes you have already installed Tableau on an initial node. For more information on installing Tableau on the initial node, see Install and Initialize TSM.
If you are installing Tableau Server on multiple nodes, you should install and configure one node at a time. This makes it easier to troubleshoot any issues you might run into.
Important: You should add and configure additional nodes when you can fully complete the process by applying pending changes. Adding a node without finishing by applying pending changes can result in users being unable to log into Tableau Server.
Installation location
Keep in mind the following requirements and limitations:
- The installation and data directory locations for Tableau Server must be the same on all nodes in a cluster.
- You can specify a non-default install location on RHEL-like distributions, but cannot change the location on Ubuntu. For more information, see Installation directory.
- When you initialize Tableau you can specify a non-default location for the data directory. For more information, see Data directory.
Generate the node bootstrap file
-
Open TSM in a browser:
https://<tsm-computer-name>:8850For more information, see Sign in to Tableau Services Manager Web UI.
-
Click the Configuration tab, and in the Add a Node box, click Download Bootstrap File.

The bootstrap file is created and copied to your local computer.
Embedded credentials are included in the bootstrap file by default. If you don't want credentials embedded in the bootstrap file, clear the Include temporary credentials in file option. If you want to completely disable the ability to include embedded credentials in node bootstrap files, you can set a configuration option for the server. See features.PasswordlessBootstrapInit for more details.
Install and initialize an additional node
Before you begin, verify that your node bootstrap file is recent. For example, if you have run tsm security regenerate-internal-tokens after you generated a bootstrap file, then initialization will fail.
-
Copy the original installer you used on the first computer along with the bootstrap file you generated and put them in a location accessible from the new computer you are adding Tableau Server to. This could be a mounted network share, or directly on the new computer.
-
If you are running a local firewall, then you need to configure firewall rules for all the nodes in the cluster.
-
On the new node, run the Tableau Server Setup program:
Use the package manager to install the Tableau Server package.
You must install the new version to the same location as the existing version. The install location must be the same on all nodes. Do not install to a location using a symbolic link or to a directory on a Network File System (NFS) volume.
-
On RHEL-like distributions, including CentOS, you have the option to install Tableau to a non-default location.
-
Default location—To install to the default location (
/opt/tableau/tableau_server), run the following commands, where<version>is formatted as major-minor-maintenance (ex:2019-2-5):sudo yum updatesudo yum install tableau-server-<version>.x86_64.rpm -
Non-default location—To install to a non-default location, you must use
rpm -i. You will also need to install all dependent packages. See the note below.Run the following command:
sudo rpm -i --prefix /preferred/install/path tableau-server.rpm
Note: When you use
yumto install Tableau Server, all dependent packages are automatically downloaded and installed. This is the preferred method for installing Tableau. If you want to install to a non-default location, or your organization does not allow you to useyumand you must install usingrpm -i, you must also install all dependent packages separately. For information about installing dependent packages, see Installing Tableau Server on an Air-Gapped Computer Running Linux. -
-
On Ubuntu, run the following commands, where
<version>is formatted as major-minor-maintenance (ex:2019-2-5):sudo apt-get update sudo apt-get upgrade sudo apt-get -y install gdebi-core sudo gdebi -n tableau-server-<version>_amd64.deb
-
-
To initialize communications between your new node and the initial node, run the initialize-tsm script that is installed when you install Tableau Server.
Navigate to the
scriptsdirectory:cd /opt/tableau/tableau_server/packages/scripts.<version_code>/
-
Run the initialize-tsm script:
sudo ./initialize-tsm -b /path/to/<bootstrap>.json --accepteula-
Use the
-bflag to provide the path to the bootstrap file that you copied to the computer. If you have encrypted the bootstrap file, then you must pipe the file as described in Securing secrets for import and export operations. -
If the bootstrap file was generated without embedded credentials, use the
-uflag to specify the user name of the administrative user on the initial node. This is the name of an administrative user on the computer, not the Tableau Server administrator. You will be prompted for the user password. For more information, see tsm topology nodes get-bootstrap-file.sudo ./initialize-tsm -b /path/to/<bootstrap>.json -u <admin-user-on-first-node> --accepteulaImportant: You must enter the credentials of the same user that you used during the installation process on the initial node.
-
The
--accepteulaflag accepts the Tableau Server End User License Agreement (EULA). The EULA is available in the following location: End User License Agreement. (Link opens in a new window)
-
Configure the additional node with Cluster Controller
-
Open TSM in a browser:
https://<tsm-computer-name>:8850
For more information, see Sign in to Tableau Services Manager Web UI.
-
Click the Configuration tab. A message should tell you that the new node was added.
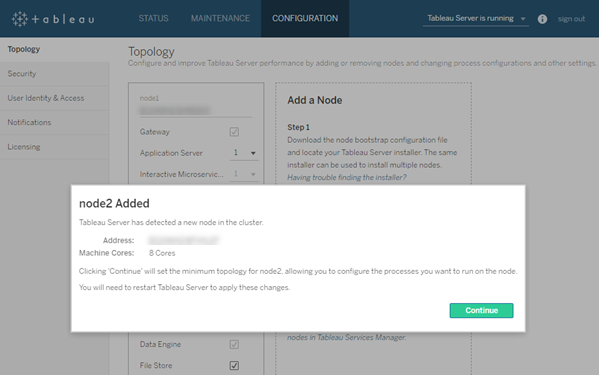
Click Continue to dismiss the message.
-
Cluster Controller is part of the minimum topology and is already selected. Each node must run Cluster Controller.
If you only want to set the minimum topology for the node, go to Step 4 below. You might do this if you will be adding additional nodes and are not ready to configure this node beyond the minimum.
If you want to add additional processes to the minimum topology, specify the processes that should run on the node. Do this by selecting the processes you want, or specifying the number of processes that should run on the node.
For example, to add a Gateway and two instances of the Backgrounder on the node:
-
Select Gateway.
-
Set the Backgrounder count to 2.
Adding Backgrounder to a node will also add an instance of Data Engine if one is not already on the node.
The specific processes and process counts you set will depend on your organizational environment and needs. Some processes are added automatically when you add another process. For more information, see Configure Nodes and Tableau Server Processes.
Note: The TSM Web UI limits you to a maximum of 8 instances of processes that allow you to select the number of instances. To configure more instances than this, use the command line and the
TSM topology set-processcommand. For more information, see tsm topology set-process. -
-
Click Pending Changes at the top of the page:

If you are configuring a cluster with three or more nodes, a Coordination Service ensemble warning displays. You can continue. You will deploy a Coordination Service ensemble in a separate step.
-
Click Apply Changes and Restart and Confirm to confirm a restart of Tableau Server.
After Tableau Server restarts, the node is included with the minimum topology necessary and any additional processes you configured.
Generate the node bootstrap file
To install Tableau Server on additional computers you use the same installer you did for the initial node, along with a "bootstrap" file you generate on the initial node.
Important: The bootstrap file contains a copy of the master keystore file used for encrypting the configuration secrets. The file can also embedded credentials which are valid for a predetermined amount of time (see tabadmincontroller.auth.expiration.minutes) and serve as a session cookie. We strongly recommend that you take additional measures to secure the bootstrap file.
The following command set provides an example method to encrypt the bootstrap file output. This method is similar to the encryption process described in more detail at Securing secrets for import and export operations.
Note however, the method here must be passed as separate arguments with trailing && \ operators as follows:
mkfifo -m 600 /tmp/secure1 && \
tsm topology nodes get-bootstrap-file --file /tmp/secure1 && \
gpg --symmetric --batch --yes --passphrase-file ~/.secrets/pgppassphrase.txt --cipher-algo AES256 --output encrypted.enc < /tmp/secure1 && \
rm /tmp/secure1
-
After installing Tableau Server on the initial node, generate the node bootstrap file.
-
On the initial node, open a terminal session.
-
Type this command to generate the bootstrap file:
tsm topology nodes get-bootstrap-file --file <path\file>.jsonEmbedded credentials are included in the bootstrap file by default. If you don't want the bootstrap file to include credentials, use the
-necor--no-embedded-credentialsoption:tsm topology nodes get-bootstrap-file --file <path\file>.json --no-embedded-credentials.If you want to completely disable the ability to include embedded credentials in node bootstrap files, you can set a configuration option for the server. See features.PasswordlessBootstrapInit for more details.
Install and initialize an additional node
-
Copy the original installer you used on the first computer along with the bootstrap file you generated and put them in a location accessible from the new computer you are adding Tableau Server to. This could be a mounted network share, or directly on the new computer.
-
If you are running a local firewall, then you need to configure firewall rules for all the nodes in the cluster.
-
On the new node, run the Tableau Server Setup program:
Use the package manager to install the Tableau Server package.
You must install the new version to the same location as the existing version. The install location must be the same on all nodes. Do not install to a location using a symbolic link or to a directory on a Network File System (NFS) volume.
-
On RHEL-like distributions, including CentOS, you have the option to install Tableau to a non-default location.
-
Default location—To install to the default location (
/opt/tableau/tableau_server), run the following commands, where<version>is formatted as major-minor-maintenance (ex:2019-2-5):sudo yum updatesudo yum install tableau-server-<version>.x86_64.rpm -
Non-default location—To install to a non-default location, you must use
rpm -i. You will also need to install all dependent packages. See the note below.Run the following command:
sudo rpm -i --prefix /preferred/install/path tableau-server.rpm
Note: When you use
yumto install Tableau Server, all dependent packages are automatically downloaded and installed. This is the preferred method for installing Tableau. If you want to install to a non-default location, or your organization does not allow you to useyumand you must install usingrpm -i, you must also install all dependent packages separately. For information about installing dependent packages, see Installing Tableau Server on an Air-Gapped Computer Running Linux. -
-
On Ubuntu, run the following commands, where
<version>is formatted as major-minor-maintenance (ex:2019-2-5):sudo apt-get update sudo apt-get upgrade sudo apt-get -y install gdebi-core sudo gdebi -n tableau-server-<version>_amd64.deb
-
-
To initialize communications between your new node and the initial node, run the initialize-tsm script that is installed when you install Tableau Server.
On the new node:
Navigate to the
scriptsdirectory:cd /opt/tableau/tableau_server/packages/scripts.<version_code>/
-
Run the initialize-tsm script:
sudo ./initialize-tsm -b /path/to/<bootstrap>.json --accepteula-
Use the
-bflag to provide the path to the bootstrap file that you copied to the computer. If you have encrypted the bootstrap file, then you must pipe the file as described in Securing secrets for import and export operations. -
If the bootstrap file was generated without embedded credentials, use the
-uflag to specify the user name of the administrative user on the initial node. This is the name of an administrative user on the computer, not the Tableau Server administrator. You will be prompted for the user password. For more information, see tsm topology nodes get-bootstrap-file.sudo ./initialize-tsm -b /path/to/<bootstrap>.json -u <admin-user-on-first-node> --accepteulaImportant: You must enter the credentials of the same user that you used during the installation process on the initial node.
-
The
--accepteulaflag accepts the Tableau Server End User License Agreement (EULA). The EULA is available in the following location:/opt/tableau/tableau_server/packages/docs.<version_code>/EULA.rtf
-
Configure the additional node
Note: This basic example illustrates how to set the topology on a node. For a more detailed, working multi-node example, see Example: Install and Configure a Three-Node HA Cluster.
On the initial (original) node, set the topology for the newly added node. The topology specifies which processes should run on the node, and how many instances of each process should run. The topology for the node will depend on your environment and organizational needs. The below are just examples of setting the topology.
-
On the initial (original) node, open a terminal session.
-
Get the node-id for the new node:
tsm topology list-nodes -v
The
-voption lists the nodes and the processes they are currently running. You can identify the newly added node because it will not have any processes on it. -
Specify the individual processes that should run on this node.
Do this with the following command:
tsm topology set-process -n <nodeID> -pr <processname> -c <n>You must add an instance of the Cluster Controller to each node.
For example, to add the Cluster Controller, two instances of the Backgrounder, and a Gateway to node2:
tsm topology set-process -n node2 -pr clustercontroller -c 1
tsm topology set-process -n node2 -pr backgrounder -c 2
tsm topology set-process -n node2 -pr gateway -c 1
The specific processes and process counts you set will depend on your organizational environment and needs. Some processes are added automatically when you add another process. For more information, see Configure Nodes and Tableau Server Processes.
-
Apply the node configuration. If the pending changes require a server restart, the
pending-changes applycommand will display a prompt to let you know a restart will occur. This prompt displays even if the server is stopped, but in that case there is no restart. You can suppress the prompt using the--ignore-promptoption, but this does not change the restart behavior. If the changes do not require a restart, the changes are applied without a prompt. For more information, see tsm pending-changes apply.tsm pending-changes applyA warning about deploying a Coordination Service ensemble displays if you have deployed a three- or five-node cluster. If this is the only warning, you can safely override it using the
--ignore-warningsoption to apply the configuration changes in spite of the warning.tsm pending-changes apply --ignore-warnings
Install drivers
You need to install drivers so that Tableau Server can connect to data and run extracts. Install these drivers on nodes that are running any of the following processes:
- VizQL Server (vizqlserver)
- Application Server (vizportal)
- Data Server (dataserver)
- Backgrounder (backgrounder)
Drivers and administrative views
If you want to use the built-in administrative views in Tableau Server, you also need to install the PostgreSQL driver on any nodes running any of the above processes.
For more information, see Database Drivers.