Use Custom Views
A custom view is a shortcut to a specific state of interaction, such as filter selections and sorting, for a published viz. Custom views don't impact the underlying content. They're a good option if you find yourself adjusting the same filters or zooming into the same data every time you look at a viz.
Custom views aren't the same as web editing, which changes the underlying published content itself. See Edit Tableau Views on the Web(Link opens in a new window).
If the custom views are specifically for filter settings, consider using embedding filter parameters in a shared URL. See Filter a published dashboard by editing the URL(Link opens in a new window) from The Data School(Link opens in a new window).
Notes on custom views
- A custom view doesn't modify the content it's built on.
- Deleting the original content deletes its custom views.
- If the original content is updated or republished, the custom view is also updated.
Tip: Some changes to the original content can break the custom view. See Maintain Content with Custom Views(Link opens in a new window) for best practices on modifying content with custom views.
- If a user is removed from the site, any shared custom views they owned are also lost.
- Subscriptions based on custom views may be more fragile than subscriptions based on the original content.
Note: As of the 2022.3 release, Tableau replaced user names in the custom view URL with IDs. Bookmarked URLs still work but are redirected to the new URL schema. This change is to add more company and user data protection.
Create a custom view
Start by navigating to the individual view. Make whatever changes you want to capture in the custom view, such as selecting marks, filtering data, or changing sorts.
-
When you’re ready to save the changes you’ve made as a custom view, select Save Custom View from the toolbar.
Note: The Save Custom View button appears in the toolbar after any changes are made to the current view.
- In the Save Custom View dialog, enter a name for the custom view.
- (Optional) Select Make it my default.
- (Optional) Select Make visible to others. This makes the custom view available to everyone who can see the original content. However, there are several instances when this option isn't available:
- The user is a Viewer site role.
- The site's User Visibility setting is set to Limited.
- The permission capability Share Customized is denied on the workbook.
- Click Save.
Find a custom view
From a view
When you're looking at a viz, you can change to a different custom view by selecting the View icon in the toolbar. If there's room in the toolbar, the name of the custom view you're looking at is shown.
Any custom views you've made, and all visible custom views made by other users, appear in the list.
From the workbook
When you're looking at content at the workbook level, use the Custom Views tab to see all the available custom views for that workbook.
Set a default custom view
After you've found or made a custom view, you make it the default you see when you open that viz.
- Select the View icon in the toolbar.
- Check the Set this view a your default option.
- Close the dialog to save.
The next time you open that viz, you'll land on that custom view.
Share a custom view
By default, custom views are private and only appear for the user who created them.
Note: Users with a Viewer site role can't make custom views visible to others. However, they can share a custom view by copying and sharing the URL.
Users with a site role of Explorer or higher can set a custom view as visible to others. This setting allows anyone with access to the original content to see the custom view.
To change an existing private custom view to be visible to others (or to make a visible view private):
- Select the View icon in the toolbar.
- Toggle the eye icon to the view you want to share to the desired state.
- Close the dialog to save.
The eye with a slash  indicates the view is private to you. The eye
  indicates the view is visible to others.
Delete a custom view
To delete a custom view:
- Select the View icon in the toolbar.
- Select the trash icon of the view you want to delete.
- Confirm that you want to delete the view.
Take care when deleting
If you're the owner of a custom view that's visible to others, remember it's deleted for everyone if you delete it.
Deleting a custom view also deletes any subscriptions based on that custom view.
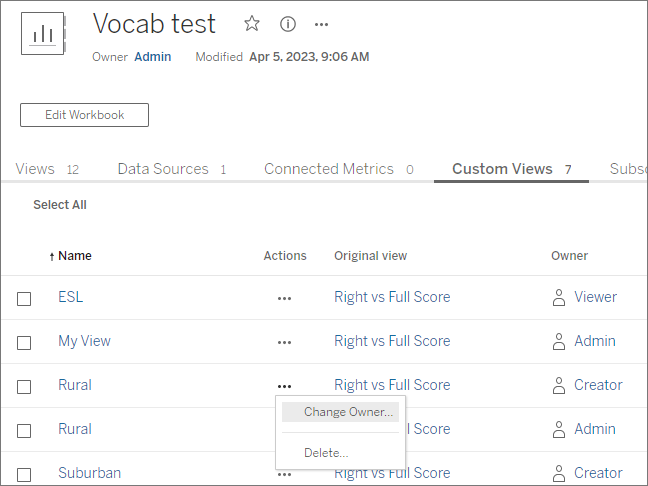
Manage custom views
Administrators can change ownership for custom views and delete custom views created by other users.
Custom views can be managed for a piece of content or for a specific user.
- Go to the Custom Views tab for the workbook or user.
- Use the action menu to change the owner or delete the custom view.
Tip: It's a best practice to change ownership of any custom views belonging to a user before removing them from the site. Deleting a user also deletes their custom views, including public views others may be using.
Safely change content with custom views
If you need to modify a view that has custom views (or the data source the view is built on), be aware that certain changes can break custom views. For more information, see Maintain Content with Custom Views(Link opens in a new window).