Configuring Proxies and Load Balancers for Tableau Server
In most enterprises, Tableau Server needs to communicate with the internet. Tableau Server was designed to operate inside a protected internal network. Do not set up Tableau Server directly on the internet or in a DMZ. Instead, communications between your network and the internet should be mediated using proxy servers. Forward proxy servers mediate traffic from inside the network to targets on the internet. Reverse proxy servers and load balancers mediate traffic from the internet to targets inside the network.
Who should read this article?
This article is for IT professionals who are experienced with general networking, load balancing, and gateway proxy solutions. The article describes how and when Tableau requires internet access, and describes how to configure your network and Tableau to use proxy servers and load balancers for access to and from the internet. There are many third-party solutions available, so some of the content in the article is necessarily generic.
Before you configure a proxy server, see Communicating with the Internet.
Configure a forward proxy server
To enable communication from Tableau Server to the internet, deploy Tableau Server behind a forward proxy server. When Tableau Server needs access to the internet, it doesn't send the request directly to the internet. Instead, it sends the request to the forward proxy, which in turn forwards the request. Forward proxies help administrators manage traffic out to the internet for tasks such as load balancing, blocking access to sites, etc.
If you use a forward proxy, you must configure the computers that run Tableau Server inside the network to send traffic to the forward proxy. Tableau Server doesn't support pass-through or manual proxy authentication.
If you are running OpenID authentication with a forward proxy solution, additional configurations are required. See Configure OpenID to work with a forward proxy.
Configuring Tableau Server on Windows to work with a forward proxy
The steps for configuring internet options on the Tableau Server computer depend on which of these scenarios describes your enterprise:
-
Your organization doesn't use a forward proxy solution. If your organization is not running a proxy solution and the computer where you are installing Tableau Server can communicate with the internet, you don’t need to follow the procedures here.
-
A proxy solution is deployed, and automatic configuration files define connection settings. If your organization uses automatic configuration files (such as PAC or
.insfiles) to specify internet connection information, you can use this information in the Local Area Network (LAN) Settings dialog box in Windows. For more information, see Enable Automatic Detection and Configuration of Browser Settings on the Microsoft support site. -
A proxy solution is deployed, but automatic configuration files are not deployed. For this scenario, you must configure LAN settings on the Windows computer that is running Tableau Server so that connections to your proxy server are run under the security context of the Run As User account. You must also configure
localhostand other internal Tableau Server instances as exceptions.
The following procedure describes the steps for the last scenario—a proxy solution without automatic configuration files, where Tableau Server is running on Windows Server.
Note: If you are using a distributed installation of Tableau Server, perform the following procedures on the initial server node and on each additional node.
Step 1: Add the Run As service account to the Local Administrators group
To perform this procedure, you must log onto the Tableau Server computer with the as the Run As service account. By default, the "log on locally" policy is not applied to the Run As service account. Therefore, you must temporarily add the Run As service account to the Local Administrators group.
If you haven't installed Tableau Server on the computer yet, see Change the Run As Service Account. If you already installed Tableau Server and configured the Run As service account, then you can determine the Run As service account name by signing into TSM Web UI. The Tableau Server Run As service account is listed on the Security tab of the Configuration window. See Sign in to Tableau Services Manager Web UI.
Add the Run As service account to the Local Administrators group using steps in Add a member to a local group on the Microsoft website. When you've finished configuring the forward proxy information, you'll remove the Run As service account from the Local Administrators group.
Step 2: Configure the proxy server in Windows LAN Settings
-
Using the Run As service account, log onto the computer where Tableau Server is installed or will be installed.
-
Open the Local Area Network (LAN) Settings dialog box. (A quick way to get to this dialog box is to search for
Internet Optionsin the Windows Start menu. In the Internet Properties dialog box, click the Connections tab, and then click LAN settings.) -
Under Proxy server, select Use a proxy server for your LAN, enter the proxy server address and port, and then select Bypass proxy server for local addresses.

Leave this dialog box open and continue to the next step.
Step 3: Add exceptions to bypass the proxy server
You add exceptions to this proxy configuration to guarantee that all communications within a local Tableau Server cluster (if you have one now or will have one later) do not route to the proxy server.
-
In the LAN settings dialog box, click Advanced. (This button is available only if you've selected the option to use a proxy server for your LAN.)
-
In the Proxy Settings dialog box, in the Exceptions field, enter the following:
localhost- Server host names and IP addresses of other Tableau Server computers in the same cluster.
Use semicolons to separate items.
-
Close the proxy settings dialog box and the Local Area Network (LAN) Settings dialog box.
-
In the Internet Properties dialog box, click OK to apply the settings.
Stay logged onto the computer and continue to the next step.
Step 4: Verify proxy settings do not conflict with Windows environment variables
Some organizations configure forward proxy settings as environment variables in the Windows operating system. If such settings are configured on the computer that is running Tableau Server, then you must verify that they do not conflict with the configurations you've completed here.
This verification is important if your Tableau Server is enabled for ATR licensing. ATR licensing is enabled by default on Tableau Server version 2021.4 and later.
-
On the computer that is running Tableau Server, enter "advanced system settings" in the search box and then click Enter to open the System Properties box.
-
On the Advanced tab, click Environment Variables.
-
Scroll through the System variables field.
If
http_proxyorhttps_proxyare specified, verify that the values do not conflict with the proxy server address that you configured in the previous step.-
If the existing settings do not conflict, then go to "Step 5: Test the proxy configuration."
-
If the existing settings do conflict, then create a new variable named
no_proxy, and enter:- the host name,
- IP address
For example,
localhost,192.168.0.10. For more information see the Microsoft MSDN article, Set Environment Variables.
-
-
Click OK.
Step 5: Verify that the WinHTTP proxy settings do not conflict with Windows LAN settings
If Server ATR is enabled (it is enabled by default in Tableau Server 2021.4 or later), verify that the WinHTTP proxy is configured and does not conflict with Windows LAN Settings.
-
Using the Run As service account, log onto the computer where Tableau Server is installed or will be installed.
-
Open the command prompt and use the following command to confirm the current configuration:
netsh winhttp show proxy -
Configure the proxy for WinHTTP using either of the following methods:
-
Use the following command if you import the configuration from Windows LAN Settings:
netsh winhttp import proxy source=ie -
Use the following command to configure WinHTTP proxy separately:
netsh winhttp set proxy <proxy server> <proxy bypass list>
For more information see Configure the proxy server manually using netsh command(Link opens in a new window) at the Microsoft website.
-
-
Confirm that the proxy settings do not conflict with other Windows proxy configurations.
Step 6: Test the proxy configuration
To test the new configurations, while still logged in with the Run As service account on the Tableau Server computer, open a web browser and test the following Tableau URLs:
https://mapsconfig.tableau.com/v1/config.json(Link opens in a new window) and https://api.mapbox.com/(Link opens in a new window) will prompt you to download a json file.
Step 7: Remove the Run As service account from the Local Administrator group
After you have tested the proxy settings, remove the Run As service account from the Local Administrators group. Leaving the Run As service account in the administrator group elevates the permissions of the Run As service account and is a security risk.
Restart Tableau Server to ensure that all changes are implemented.
Server crash reporter
If your organization uses a proxy server to connect to the internet then you must configure Tableau Server's crash reporter to use the proxy. Even if you have already configured Tableau Server to use a proxy, you must also configure server crash reporter separately. To configure proxy for server crash reporter, see Configure Server Crash Reporter.
How a reverse proxy and a load balancer works with Tableau Server
Reverse proxies and load balancers are servers that receive requests from external (internet) clients and forwards them to Tableau Server. These solutions make Tableau Server available to the internet without having to expose the individual IP address of that particular Tableau Server to the internet. They may also act as authentication and pass-through devices, so that no data is stored where people outside the company can get to it. This requirement can be important for organizations that are subject to various privacy regulations such as PCI, HIPAA, or SOX.
The following diagram illustrates the communication path when a client makes a request to Tableau Server that is configured to work with a reverse proxy and/or load balancer (LB).
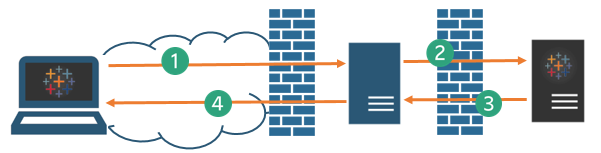
-
An external client initiates a connection to Tableau Server. The client uses the public URL that's been configured for the reverse proxy server/LB, such as
https://tableau.example.com. (The client doesn't know that it's accessing a reverse proxy/LB.) -
The reverse proxy maps that request in turn to a request to Tableau Server. In some scenarios, the reverse proxy may be configured to authenticate the client (using SSL/TLS) as a precondition to passing the request to Tableau Server.
-
Tableau Server gets the request and sends its response to the reverse proxy/LB.
-
The reverse proxy/LB sends the content back to the client. As far as the client is concerned, it just had an interaction with Tableau Server, and has no way to know that the communication passed through intermediary server(s).
TLS/SSL
Depending on your gateway scenario, you should consider configuring your reverse proxy and load balancing servers to use TLS/SSL for any traffic that's external to your network. This helps to ensure privacy, content integrity, and authentication. Unless you've deployed other security measures to protect traffic between your internet gateway and Tableau Server, we also recommend configuring SSL between the gateway proxy and Tableau Server. You can use internal or self-signed certificates to encrypt traffic between Tableau Servers and other internal computers.
Mobile access
Tableau Server adds an X-header to all HTTP responses for Tableau Mobile sessions. By default, most proxy solutions will preserve X-headers. If your gateway solution does not preserve X-headers, then you will need to configure your proxy server and load balancer to preserve the following header to all HTTP responses for Mobile client sessions: X-Tableau: Tableau Server.
If you have configured authentication at the gateway, then your proxy server/LB must respond to Tableau Mobile HTTP requests with a HTTP 302 response. The 302 must include a redirect to the identity provider login page. To view a diagram that describes the 302 authentication sequence, see Tableau Mobile Authentication Sequence(Link opens in a new window) in the Tableau Community.
Reverse proxy, load balancer and user authentication
Tableau Server will always authenticate users. This means that even if you are authenticating inbound connections at the gateway for your organization, Tableau Server will still authenticate the user.
However, not all clients will support user authentication with with a gateway solution:
-
For supported web browsers, you can use SAML, OpenID Connect, Kerberos, Trusted Tickets or manual authentication with a reverse proxy/LB.
-
Tableau Mobile supports SAML or manual authentication with a reverse proxy/LB. The iOS version of Tableau Mobile additionally supports Kerberos with a reverse proxy/LB. The same recommendation above applies.
-
Tableau Prep does not support authentication with a reverse proxy or load balancer. For remote access, use a VPN solution or configure your gateway services to route traffic from Tableau Prep directly to Tableau Server for authentication.
-
Tableau Desktop supports authentication with a reverse proxy provided that an authentication module is performing preauthentication on the reverse proxy before traffic is routed to Tableau Server for final authentication. For more information, see Part 5 - Configuring Web Tier(Link opens in a new window) of the Tableau Server Enterprise Deployment Guide and Configure Authentication Module with Independent Gateway.
If your organization is authenticating with Active Directory:
- Active Directory with Enable automatic logon (SSPI) is not supported with a reverse proxy.
- Tableau Server must be configured for reverse proxy before configuring Tableau Server for Kerberos. For more information, see Configure Kerberos.
Configure Tableau Server to work with a reverse proxy server and/or load balancer
Before you configure Tableau Server, you'll need to collect the following information about the proxy server configuration. To configure Tableau Server, you use the tsm configuration set command. The information you need to collect corresponds to options you'll need when you run tsm.
Most of the following tsm options are also used to configure Tableau Server deployments that operate behind a load balancer. For more information, see Add a Load Balancer.
| Item | Description | Corresponding tsm configuration set option |
|---|---|---|
IP address or CNAME |
You can either enter an IP address or a CNAME for this option. The public IP address or addresses of the proxy and load balancer servers. The IP address must be in IPv4 format, such as If you are unable to provide a static IP, or if you are using cloud proxies or external load balancers, you can specify the CNAME (Canonical Name) DNS value that clients will use to connect to Tableau Server. This CNAME value must be configured on your reverse proxy solution to communicate with Tableau Server. |
gateway.trusted
|
| FQDN | The fully qualified domain name that people use to reach Tableau Server, such as tableau.example.com. Tableau Server doesn't support context switching for this option. For example, the following URL is not supported: example.com/tableau. |
gateway.public.host
|
| Non-FQDN | Any subdomain names for the proxy or LB servers. In the example of tableau.example.com, the subdomain name is tableau. |
gateway.trusted_hosts
|
| Aliases | Any public alternative names for the proxy or LB servers. In most cases, aliases are designated using CNAME values. An example would be a proxy server bigbox.example.com and CNAME entries of ftp.example.com and www.example.com. |
gateway.trusted_hosts
|
| Ports | Port numbers for traffic from the client to the reverse proxy server. |
|
If you are using a distributed installation of Tableau Server, then run the following tsm commands on the initial node in your cluster.
-
Enter the following command to set the FQDN that clients will use to reach Tableau Server through the proxy and/or LB servers, where
nameis the FQDN:tsm configuration set -k gateway.public.host -v "name"For example, if Tableau Server is reached by entering
https://tableau.example.comin the browser, enter this command:tsm configuration set -k gateway.public.host -v "tableau.example.com" -
Enter the following command to set the address or the CNAME of the proxy and or LB servers, where
server_addressis the IPv4 address or CNAME value:tsm configuration set -k gateway.trusted -v "server_ip_address"If your organization uses multiple proxy servers and/or LB servers, enter multiple IPv4 addresses, separating them with commas. IP ranges are not supported. To improve start up and initialization of Tableau Server, minimize the number of entries for
gateway.trusted. -
Enter the following command to specify alternate names for the proxy/LB servers, such as their fully qualified domain names, any not fully qualified domain names, and any aliases. If there's more than one name, separate the names with a comma.
tsm configuration set -k gateway.trusted_hosts -v "name1, name2, name3"For example:
tsm configuration set -k gateway.trusted_hosts -v "proxy1.example.com, proxy1, ftp.example.com, www.example.com" -
If the proxy server is using SSL to communicate with the internet, run the following command, which tells Tableau that the reverse proxy server is using port 443 instead of port 80:
tsm configuration set -k gateway.public.port -v 443Note: If the proxy server is using SSL to communicate with Tableau Server, SSL must be configured and enabled on Tableau Server.
-
Enter the following command to commit the configuration change:
tsm pending-changes applyIf the pending changes require a server restart, the
pending-changes applycommand will display a prompt to let you know a restart will occur. This prompt displays even if the server is stopped, but in that case there is no restart. You can suppress the prompt using the--ignore-promptoption, but this does not change the restart behavior. If the changes do not require a restart, the changes are applied without a prompt. For more information, see tsm pending-changes apply.
Configure the reverse proxy or load balancing server to work with Tableau Server
When a client accesses Tableau Server through a reverse proxy or load balancer, specific message headers have to be preserved (or added). Specifically, all servers in the message chain must be represented in the gateway.trusted and gateway.trusted_hosts settings.
The following graphic shows example headers for a single-hop message chain, where the proxy server is communicating directly with Tableau Server:

The following graphic shows example headers for a multiple-hop message chain, where the message traverses two proxy servers before connecting to Tableau Server:

The following table describes what these headers are and how they relate to the configuration settings on Tableau Server:
| Headers | Description | Related Tableau Server settings |
REMOTE_ADDR and X-FORWARDED-FOR (XFF) |
Tableau Server needs these headers to determine the IP address of origin for requests. X-FORWARDED-FOR header must present IP address chain to Tableau Server in the order the connections have occurred. |
The IP address that you set ingateway.trusted must match the IP presented in REMOTE_ADDR. if you sent multiple addresses ingateway.trusted, one of them must match the IP presented in REMOTE_ADDR. |
HOST and X-FORWARDED HOST (XFH) |
These headers are used to generate absolute links to Tableau Server when it replies to the client. X-FORWARDED-HOST header must present host names to Tableau Server in the order the connections have occurred. |
The host names that are presented in X-FORWARDED-HOST header must be included in the host names that you specify in gateway.trusted_hosts. |
X-FORWARDED-PROTO (XFP) |
This header is required if SSL is enabled for traffic from the client to the proxy, but not for traffic from the proxy to Tableau Server. The Related KB article: "Unable to Sign In" and "Invalid username or password" Error With SAML After Upgrading(Link opens in a new window). |
Port configuration on reverse proxy (inbound connections from client and outbound connections to Tableau Server) must be specified in the corresponding parameter: If the proxy server is using SSL to communicate with Tableau Server, SSL must be configured and enabled on Tableau Server. |
Validate reverse proxy and load balancer configuration
To validate your gateway-to-Tableau Server configuration, publish workbooks and datasources using Tableau Server web authoring or Tableau Desktop. If you are connecting with a web browser to Tableau Server from the internet, verify that you are using a recommended browser(Link opens in a new window). Publish and view workbooks that use existing datasources as well as a datasource that you've published . Use the links below to familiarize yourself with connecting with Tableau Server as an end-user.
| Task | Documentation |
|---|---|
| Overview of web authoring. | Use Tableau on the Web(Link opens in a new window) |
| Log in to Tableau Server from Tableau Desktop or a web browser. | Sign in to Tableau Server or Online(Link opens in a new window) |
| Publish a workbook to Tableau Server. | Publish a Workbook(Link opens in a new window) |
| Publish a data source. | Publish a Data Source(Link opens in a new window) |
| Open workbook from Tableau Server. | Opening Workbooks from the Server(Link opens in a new window) |
| Log out Server (with Desktop). | Sign in to Tableau Server or Online(Link opens in a new window) |
| Download workbook from a web browser. | Download Workbooks(Link opens in a new window) |
| Check to make sure tabcmd (from a non-server client) works. | tabcmd |