Configure the Bridge Client Pool
This topic describes how site admins can configure and manage pooling for Bridge clients. Pooling allows clients across the site to load balance data freshness tasks for data sources or virtual connections that connect to private network data.
Configure pooling
The purpose of a pool is to distribute (or load balance) data freshness tasks among the available clients in a pool whose access is scoped to a domain within your private network. Pools map to domains, giving you the ability to dedicate pools to keeping specific data fresh and maintaining security by restricting access to protected domains in your private network.
Although the client in the pool that performs the data freshness task is chosen at random, if for whatever reason a client can no longer perform the task, the task is automatically rerouted to another available client in the pool to handle the task. There is no additional intervention required from you or your users to support or manage the pool of clients.
Pooling is optimized for keeping data sources or virtual connections that connect to data on one or more private networks fresh. Pooling support does not extend to data sources that use Bridge (legacy) schedules.
Bridge doesn't support refreshing live connections with pools for some private cloud-based data sources. For more information, see Configure the Bridge Client Pool
In general, pooling is optimized for the following situations:
-
Bridge is used as a critical service. If your organization requires that live query and scheduled refresh support must be available even if a client becomes unavailable.
-
Client is at capacity. If your existing site traffic exceeds the current capacity of the client.
-
Tableau Cloud-managed schedules for file-based data sources. Beginning with Bridge client version 2021.4.3, Bridge pools enable Online schedules for file-based data sources.
-
Keeping data fresh on multiple private networks.
- Virtual connections. (Requires Data Management) Bridge is required to refresh data in virtual connections that connect to private network data. For more information about virtual connections, see About Virtual Connections and Data Policies.
Before configuring the pool
Before you can configure a client pool for your site, review the following:
- Clients must be installed and running. For more information about software and hardware, see Bridge is designed to scale up and scale out. When configuring your Bridge deployment, consider the following:.
- Clients are configured to run as a service. For more information, see Application versus Service mode.
- The user authenticated into a client is a Tableau Cloud site admin. For more information about deploying Bridge, see Plan Your Bridge Deployment.
- To keep virtual connections fresh, ensure all clients in the pool are running Bridge 2021.4 (or later).
- To load balance file-based data sources, ensure the following:
- All clients in the pool are running Bridge 2021.4.3 (or later).
- References to file data must use the full UNC path that includes the server name or hostname. For more information, see About the Bridge Client.
- File-based data sources are extract only.
Note about user roles
Only site admins, or users with either the Site Administrator or Site Administrator Creator role, can configure and maintain pooled clients. Regardless of the type of user authenticated into the client, only site admins can add new pools, add clients to a pool, remove clients from a pool, and monitor clients in a pool.
Note about refresh jobs
The Jobs page can show you the completed, in progress, pending, canceled, and suspended all Bridge refresh jobs that use Online schedules. This includes refreshes for file-based and non-file based data sources. For more information, see About Bridge Refresh jobs. For more information about various ways you can monitor Bridge activity, see Monitor data freshness tasks.
Step 1: Ensure clients can connect to the site
In order for Bridge to work with your site, you must allow clients to authenticate to the site.
-
Sign in to Tableau Cloud using your site admin credentials and go to the Settings page.
-
Click the Authentication tab and validate that the Let clients automatically connect to this Tableau Cloud site check box under the Connected Clients heading is selected. For more information about this check box, see Access Sites from Connected Clients.
Note: If enabled, the connected clients option must be enabled to support multi-factor authentication with Tableau authentication. If connected clients are disabled for your site, Bridge can only support Tableau username and password authentication.
Step 2: Configure a pool
Pools, which require Bridge 2021.4 (or later) clients, help route live query and extract refresh jobs to the appropriate private network. Use pools to access data distributed across multiple private networks, enable extract refreshes for file-based data sources, and to support data freshness tasks for virtual connections.
- On the Bridge tab, under Pooling, click the Add New Pool button.
- In the dialog box, enter a new pool name in the Pool text box and click Save.
After you have at least one pool configured, as part of the publishing process, Tableau Cloud associates certain data sources or virtual connections with Bridge and client pools automatically.
Step 3: Specify a domain for a pool
Each new pool requires a domain to be specified through the Private Network Allowlist. This information is required to enable Bridge access to data in the private network on behalf of Tableau Cloud.
Using the private network allowlist, you must specify the domains of the private network where you want to enable client access. These domains should correspond to private network locations of databases and file shares that you want to make accessible to Bridge on behalf of Tableau Cloud.
Domain names
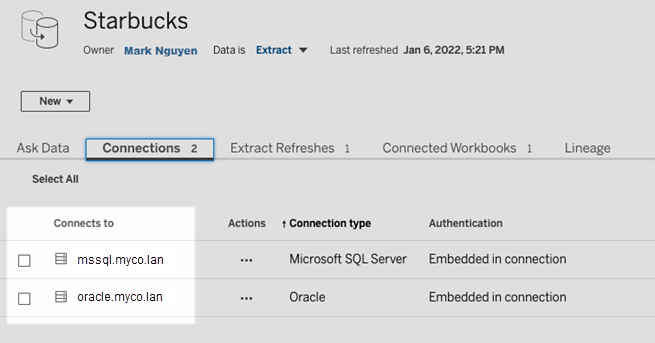
The domain names that you specify in the allowlist are the server names used in the data source connection or virtual connection. In some cases, you can find the server name listed in the Connections tab of the data source page in Tableau Cloud.
Note: When accessing workbooks which connect to published data sources, do not use *.tableau.com in the Private Network Allowlist. The domain *.online.tableau.com is used for proxy filtering for outbound connections. See Optional forward proxy filtering.
For example, to keep data sources like “Starbucks” up to date, you might specify “mssql.myco.lan” and “oracle.myco.lan” or “*.myco.lan” in the allowlist.
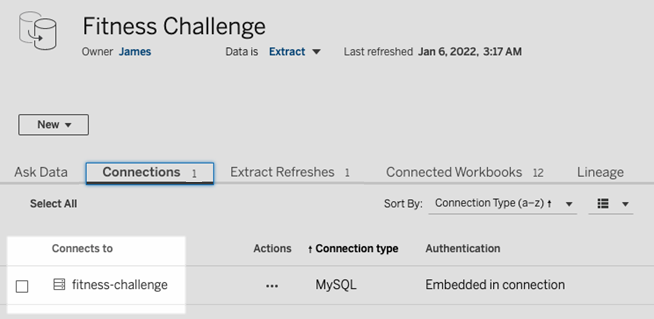
To keep data sources like "Fitness Challenge" up to date, specify "fitness-challenge" in the allowlist.
In other cases, the Connections tab might not list the server name. When the server name is not listed, consider working with the content owner to identify where the data is hosted and specify the server name in the allowlist when you have that information. As a temporary alternative, you can skip to Step 4: Add clients to a pool to assign clients to use the Default Pool instead.
IP addresses
Instead of domain names, you can specify IPv4 addresses in the allowlist. We recommend you specify IPv4 addresses in the allowlist if IPv4 addresses are used in the data source connections or virtual connections. Consider working with your content owners to get this information. If you don’t have that information, as a temporary alternative, you can skip to Step 4: Add clients to a pool to assign clients to use the Default Pool instead.
Notes:
- For security purposes, the allowlist is empty by default to prevent Tableau access. This ensures that site admins specify what data can be sent to Tableau Cloud using Bridge.
- You can use Fiddler with Tableau Desktop to capture the URI that is used when connecting to a data source. For more information, see Fiddler.
- You can assign one or more domains to a pool.
- If your site was set up to use pooling prior to Tableau 2021.4, the Default Pool remains for backward compatibility purposes but can't be configured to access a specific private network. To reduce the scope of access of this pool and to enable more advanced scheduling capabilities, we recommend you create new pools and map them to specific domains.
To map a domain to a pool, do the following:
-
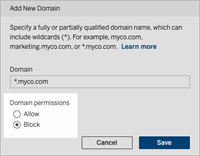
While on the Bridge tab, under the Private Network Allowlist, click the Add New Domain button.
-
In the Domain text box, enter the URI of the domain using the information described in Allowlist registry rules.
-
Under Domain permissions, ensure the Allow radio button is selected.
-
Under Pool, select the pool whose scope of access should be limited to the URI you specified in step 2.
- Repeat steps 1-4 for each additional domain.
-
When finished, click Save.
Allowlist registry rules
Use the following rules when specifying the domains that you want to enable Bridge access to. This allows Bridge, on behalf of Tableau Cloud, to access the data on your private network to perform data freshness tasks. A domain enables Bridge to connect to both databases and file data hosted in that domain.
Notes:
- Domains are not verified when added to the allowlist, when data sources or virtual connections are published, or when refresh schedules are configured.
- Duplication due to the same domain being added to the allowlist as both the domain name and its IP address are not verified. In this scenario, if one pool maps to the domain name and another pool maps to the IP address, the format specified in the data source connection or virtual connection determines which pool keeps the data fresh.
- Domains must be accessible by Bridge. This means, all clients in the pool must have access to the specified domain.
- If no domains are specified, Bridge is unable to run data freshness tasks for data sources or virtual connections configured for Online schedules. Note: Data sources configured for Bridge (legacy) schedules will continue to run in the same way.
| Scenario | Description | Example |
| Exact domain name | Can either be a FQDN or PQDN. Port numbers are not allowed. |
myco.com |
| Range of domain names |
Use an optional leading wildcard (*) to include all subdomains. The * must be followed directly by a period (.). |
*.myco.com |
| Exact IPv4 address | Use an IPv4 literal (abbreviations are not allowed). IPv6 addresses are not allowed. |
255.255.0.1 |
| Range of IPv4 addresses | Use a subnet mask to include a range of IPv4 addresses. | 255.255.0.1/16 |
| Block domains | (Named pools only) Block Bridge connectivity to hosts in this domain. |
When adding or editing a domain in the private network allowlist, select the Block radio button option.
|
Allowlist registry examples
Example 1 - database data
Suppose you want Bridge to do the following:
- Perform data freshness tasks for data located in data.lan and sqlserver.myco.lan.
- Prevent data freshness tasks for data located in oracle.myco.lan.
To enable Bridge to support these scenarios, you can map the domains to two pools (A and B) and block the third domain.
| If you specify... | and map to pool... | ...data is refreshed in locations |
| *.lan | Pool A | data.lan |
| sqlserver.myco.lan | Pool B | sqlserver.myco.lan |
|
*.myco.lan Note: Although this domain range blocks data freshness tasks on oracle.myco.lan, a blocked domain range can unblock a specific domain within it if the domain is explicitly allowed, such as sqlserver.myco.lan. |
(Blocked) | - |
Example 2 - file data
Suppose you have file data, C:\Shared\employees.csv, located on fileserv.myco.lan. To enable Bridge access to this data, map the domain of the machine to a pool. You can specify one of the following domains to a pool:
- Option #1: *.lan
- Option #2: *.myco.lan
- Option #3: fileserv.myco.lan
Note: The host machine must allow network access to the "Shared" folder.
Step 4: Add clients to a pool
Follow the procedure below to assign clients not already assigned to a pool.
Note: To support data freshness tasks for all data, ensure clients in the pool are running Bridge 2021.4 (or later).
- On the Bridge tab in the Unassigned Clients table, navigate to the client you want to assign to a pool and click Assign.
- In the Pool drop-down menu, select the pool you want to associate with the client.
- Repeat step 2 for each unassigned client you want to assign to a pool.
Troubleshoot pooling
Bridge Refresh jobs fail with one of the errors listed below.
The following errors can be seen on the Jobs page and the Background Tasks for Non Extracts admin view.
-
"errorID=NO_POOLED_AGENTS_ASSIGNED"
This issue is specific to default pools and can occur for one of two reasons:
-
When the server address or IP address of a data source does not match a domain specified in the Private Network Allowlist. This causes refresh jobs to be sent to the Default Pool where there are no assigned clients.
To resolve this issue, make sure 1) the allowlist contains the domains (server addresses or IP addresses) used by the data sources, and 2) at least one pool is associated with those domains (sever addresses or IP addresses). For more information, see Step 3: Specify a domain for a pool.
- When there are no clients in the default pool. To resolve this issue, add at least one Bridge 2020.2 (or later) client to the default pool. For more information, see Step 4: Add clients to a pool.
-
-
"errorID=NO_POOLED_AGENTS_ASSIGNED_NAMED_POOL"
This issue can occur when there are no clients in the named pool. To resolve this issue, add at least one Bridge 2021.4 (or later) client to the named pool. For more information, see Step 4: Add clients to a pool.
-
"errorID=NO_AGENT_IN_POOL_SUPPORTS_REMOTE_EXTRACT_REFRESH"
This issue can occur when a refresh job tries to run without at least one Bridge 2020.2 (or later) client in the pool. To resolve this issue, add at least one Bridge 2020.2 (or later) client to the pool. For more information, see Step 3: Specify a domain for a pool.
-
"errorID=NO_POOLED_AGENTS_CONNECTED"
This issue can occur when none of the clients in the pool are available to run data freshness tasks. For more information, see the Configure the Bridge Client Pool section above.
-
"errorID=REMOTE_EXTRACT_REFRESH_ALL_AGENTS_BUSY" or "errorMessage: Maximum concurrency reached" in the client
These issues can occur if the number of refresh jobs running at a given time exceeds the capacity of your client pool. To help resolve this issue, you can do the following:
- Add additional clients to the pool. For more information, see Step 4: Add clients to a pool.
- Increase the size of the connectionPool setting on each client. For more information, see Change the Bridge Client Settings.
-
"errorID= AGENTS_IN_POOL_REQUIRE_UPGRADE"
Beginning with Tableau 2021.4, this issue can occur when the clients in the pool need to be upgraded to Bridge 2021.4 (or later) in order to run data freshness tasks. For more information about upgrading clients, see Install Bridge.
Bridge clients are being signed out
This issue can happen if you deploy a large number of clients under the same Windows services account. When there are more than 10 clients running under one Windows services account, account security measures can cause clients to be logged out. For more information, see Windows services account.
Other potential pooling issues
When trying to diagnose issues related to pooling, consider reviewing the following log files for a client on the Bridge client machine: tabbridgeclijob_<process_id>, jprotocolserver_<process_id>, stdout_jprotocolserver_<process_id>. For more information, see Change the Bridge Client Settings.