Filter Actions
Filter actions send information between worksheets. Typically, a filter action sends information from a selected mark to another sheet showing related information. Behind the scenes, filter actions send data values from the relevant source fields as filters to the target sheet.
For example, in a view showing the sales price of houses, when you select a particular house, a filter action can show all comparable houses in a different view. The source fields for the filter might contain sales price and square footage.
Watch a video to see real-world examples of actions. Filter actions are covered at the 2:20 mark.
Create or edit a filter action
-
Do either of the following:
-
On a worksheet, select Worksheet > Actions.
-
On a dashboard, select Dashboard > Actions.
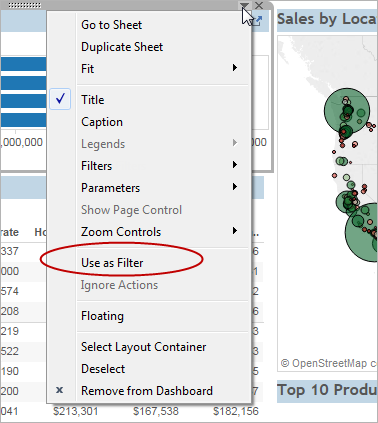
From the drop-down menu of a dashboard sheet, you can also select Use as Filter. In the Actions dialog box, "generated" appears in the default names of actions created this way.
-
-
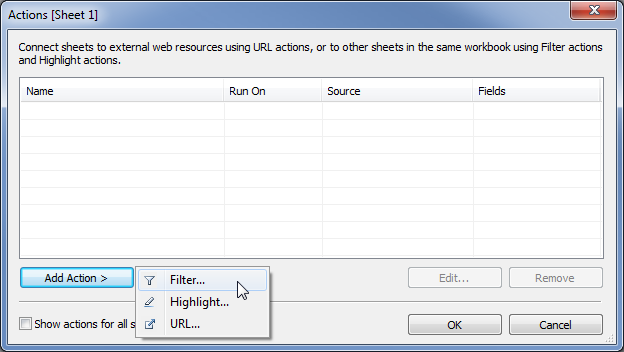
In the Actions dialog box, click Add Action, and then select Filter. Or select an existing action, and choose Edit.
-
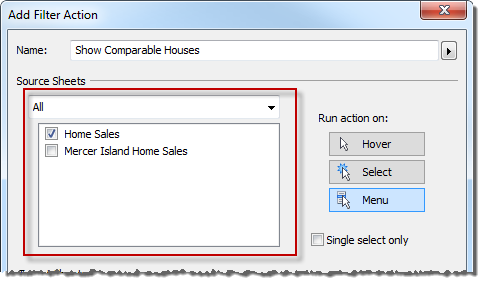
Specify a name for the action.

Tip: If you plan to launch an action from a tooltip menu, use a descriptive name so users will understand the action's purpose. From the menu to the right of the Name box, you can insert variables that are drawn from the values of selected fields(Link opens in a new window).
-
Select a source sheet or data source. If you select a data source or dashboard, you can select related sheets you want to launch the action from.
-
Specify how the action runs:
-
Hover - Runs when you mouse over marks in the view.
-
Select - Runs when you click marks in the view. If you want to avoid running the action when multiple marks are selected, also select Single-select only.
-
Menu - Runs when you right-click (Windows) or Control-click (macOS) a mark in the view, and then click an option in the tooltip menu.
-
-
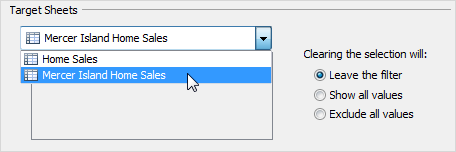
Select a target sheet. When you select a dashboard, you can select one or more sheets within it.
-
Specify what happens when the selection is cleared in the view:
-
Leave the filter - Continues to show filtered results on the target sheets. (In web-authoring mode, this is labeled Keep filtered values.)
-
Show all values - Changes the filter to include all values.
-
Exclude all values - Changes the filter to exclude all values. This option is useful when you're building dashboards that only show some sheets if a value in another sheet is selected.
-
-
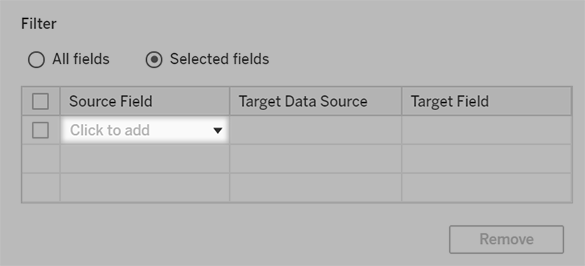
Specify the data that you want to show on the target sheets. You can filter on All Fields or Selected Fields.
-
If you chose Selected Fields, click a drop-down menu in the Source Field column, and select a field. Then select a target data source and field.
Note: Filter actions that depend on a user function, such as USERNAME(), will not work because row-level security restricts access to the data.
Understanding available target fields
In the Add Filter dialog box, the fields available in the Target Field drop-down list are limited to the data type of the Source Field. For example, if you select a text field for the source, only text fields are available as targets.
If you are connected to a relational data source, you can add sheet links across data sources even if the field names don't match. For example, if one data source has a Latitude field while another has a Lat field, you can associate the fields using the drop down lists in the Add Filter dialog box. When using a multidimensional data source, the destination sheet must use the same data source as the source sheet, and the source and target field names must match. (In Tableau, multidimensional data sources are supported only in Windows.)