Export Data from Tableau Desktop
You can export the data in a Tableau data source, including all or part of the records from your original data. Alternatively, you can export only the portion of data used to generate the view.
Note: If you're using Tableau Cloud or Tableau Server, instead see Download Views and Workbooks and Link to a PNG, PDF, or CSV of a View.
Export data in the data source
After you join tables from one or more connections and make general customizations (for example, create a calculated field, pivot fields, create groups, apply data source or extract filters, etc.) to your Tableau data source, you might want to share or reuse the data in its new form. You can do this by using one of the methods listed below.
Note: The export may exclude some table calculations and level of detail expressions.
Export your data to .csv file
Because the .csv format is one of the most simple structured formats for data, it's supported by a wide range of tools, databases, and programming languages. Exporting your data in the Tableau data source using this format creates an independent data set and can be a convenient and flexible way to share your data with others.
There are two primary ways you can export your data in the data source to a .csv file in Tableau: from the Data Source page and from the view.
-
From the Data Source page: On the Data Source page, select Data > Export Data to CSV to export all the data in your data source to .csv file.
-
From the view: On the sheet tab, drag a field to the Columns or Rows shelf, click the View Data icon in the Data pane, and click the Export All button.

Extract your data
Another way to export all of your data or a subset of your data in the data source is to create an extract (.hyper) file. An extract functions as an independent data set, which you can use to connect directly from Tableau. For more information, see Extract Your Data.
Export the data source
After you connect to your data, you can export and save your data source as a Tableau data source (.tds) file. Saving the data source creates a shortcut to your remote data and allows you to avoid having to create a new connection to a specific data set each time. For more information, see Save Data Sources.
Export data used in the view
After you create a view, you can also export just the data used to generate that view.
The fields that are exported come from the fields on the shelves of the sheet. However, fields that function as external filters, in other words, the fields that appear only on the Filters shelf, are not included in the export. If you want to include other fields with the exported data without changing the baseline view, you can place those fields on the Detail shelf.
The various methods for exporting the data used to generate the view is listed below.
- Export data in the view to Microsoft Access or .csv
- Export crosstab of data in the view to Excel
- Copy data in the view to clipboard
- Copy crosstab of data in the view to clipboard
Export data in the view to Microsoft Access or .csv
Export the data that is used to generate the view as an Access database (Windows only) or .csv file (Mac only).
-
In Tableau Desktop, select Worksheet > Export > Data.
-
Select a location and type a name for your Access database or .csv file.
-
Click Save.
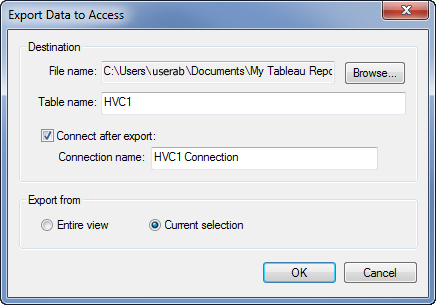
If you're on Windows, the Export Data to Access dialog box displays to give you the option to immediately use the new Access database and continue working in Access without interrupting your work flow.
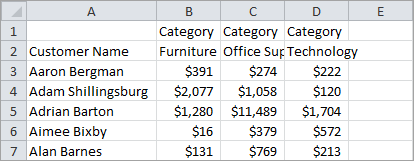
Export crosstab of data in the view to Excel
You can export directly to Excel the data used to generate the view formatted as a crosstab. When you export your view as a crosstab, Tableau automatically opens the Excel application and pastes a crosstab version of the current view into a new Excel workbook.
Although this option provides a direct method for exporting your data to another application, performance of the export can be affected because it is simultaneously copying and formatting the data. If the view you are exporting contains a lot of data, a dialog box opens asking whether you want to export the formatting. In this case, if you choose to exclude the formatting from the export, performance of the export might improve.
- In Tableau Desktop: select Worksheet > Export > Crosstab to Excel.
If you're using a Mac, this option opens a dialog box where you can save the file. You must then manually open the file in Excel. - In Tableau Server or Tableau Cloud, open a view or dashboard and select Download > Crosstab.
Select which sheets from the workbook to export data from.
Copy data in the view to clipboard
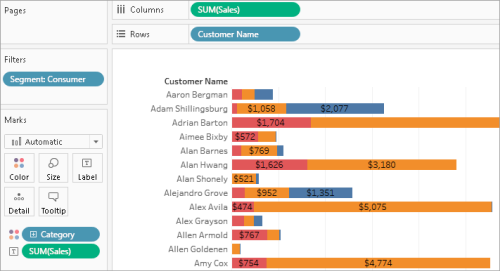
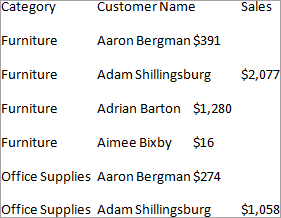
Copy the data used to generate the view so that you can paste it into another application.
-
Create a view.
-
Select Worksheet > Copy > Data.
-
Open another application, such as Word, and paste the data into the document.
In this example, the fields placed on the Columns, Rows, and Color shelves are copied into the document. However, the Customer Segment field is not copied because it is an external filter because it appears only on the Filters shelf.
Copy crosstab of data in the view to clipboard
You can copy a crosstab version of a view so that you can paste or transfer the data into another application. The pasted data always appears as a crosstab, even if the initial view of the data in Tableau did not use a crosstab format.
Copying a crosstab is restricted by some general conditions:
-
You must copy all records in the view. You cannot copy a subset of records.
-
This option is valid for aggregated views only. It cannot be used on disaggregated views of data because a crosstab is by definition an aggregated view of data. This means the Aggregate Measures option on the Analysis menu must be selected in order for copying a crosstab to work properly.
-
You cannot copy a crosstab if the view contains continuous dimensions such as continuous dates and times.
-
Other restrictions may apply depending on the data in your view.
After the general conditions are met, copy the crosstab.
-
Create a view.
-
Select Worksheet > Copy > Crosstab.
-
Open another application, such as Excel, and paste the crosstab.