Configure Server-Wide SAML
Configure server-wide SAML when you want all single sign-on (SSO) users on Tableau Server to authenticate through a single SAML identity provider (IdP), or as the first step to configuring site-specific SAML in a multi-site environment.
If you have configured server-wide SAML and are ready to configure a site, see Configure Site-Specific SAML.
The SAML configuration steps we provide make the following assumptions:
-
You are familiar with the options for configuring SAML authentication on Tableau Server, as described in the SAML topic.
-
You have verified that your environment meets the SAML Requirements, and obtained the SAML certificate files described in those requirements.
Before you begin
As part of your disaster recovery plan, we recommend keeping a backup of certificate and IdP files in a safe location off of the Tableau Server. The SAML asset files that you upload to Tableau Server will be stored and distributed to other nodes by the Client File Service. However, these files are not stored in a recoverable format. See Tableau Server Client File Service.
Note: If you use the same certificate files for SSL, you could alternatively use the existing certificate location for configuring SAML, and add the IdP metadata file to that directory when you download it later in this procedure. For more information, see Using SSL certificate and key files for SAML in the SAML requirements.
If you are running Tableau Server in a cluster, then the SAML certificates, keys, and metadata file will be automatically distributed across the nodes when you enable SAML.
This procedure requires that you upload the SAML certificates to TSM so that they are properly stored and distributed in the server configuration. The SAML files must available to the browser on the local computer where you are running the TSM web interface in this procedure.
If you have gathered and saved the SAML files to the Tableau Server as recommended in the previous section, then run the TSM web interface from the Tableau Server computer where you copied the files.
If you are running the TSM web interface from a different computer, then you will need to copy all SAML files locally before proceeding. As you follow the procedure below, browse to the files on the local computer to upload them to TSM.
-
Open TSM in a browser:
https://<tsm-computer-name>:8850. For more information, see Sign in to Tableau Services Manager Web UI.
-
On the Configuration tab, select User Identity & Access, and then select the Authentication Method tab.

-
For Authentication Method, select SAML.
-
In the SAML section that appears, complete Step 1 in the GUI, entering the following settings (do not yet select the check box to enable SAML for the server):
-
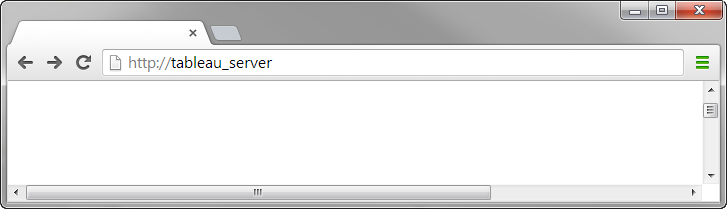
Tableau Server return URL—The URL that Tableau Server users will access, such as https://tableau-server.
Using https://localhost or a URL with a trailing slash (for example, http://tableau_server/) is not supported.
-
SAML entity ID—The entity ID uniquely identifies your Tableau Server installation to the IdP.
You can enter your Tableau Server URL again here. If you plan to enable site-specific SAML later, this URL also serves as the base for each site’s unique ID.
-
SAML certificate and key files— Click Select File to upload each of these files.
If you are using a PKCS#8 passphrase-protected key file, you must enter the passphrase with TSM CLI:
tsm configuration set -k wgserver.saml.key.passphrase -v <passphrase>After you provide the information required in Step 1 in the GUI, the Download XML Metadata File button in Step 2 in the GUI becomes available.
-
-
Now select the Enable SAML authentication for the server check box above Step 1 in the GUI.
-
Complete the remaining SAML settings.
-
For Steps 2 and 3 in the GUI, exchange metadata between Tableau Server and the IdP. (Here’s where you might need to check in with the IdP’s documentation.)
Select Download XML Metadata File, and specify the file location.
For other IdPs, go to your IdP account to add Tableau Server to its applications (as a service provider), providing the Tableau metadata as appropriate.
Follow the instructions in the IdP’s website or documentation to download the IdP’s metadata. Save the .xml file to the same location that holds your SAML certificate and key files. For example:
/var/opt/tableau/tableau_server/data/saml/idp-metadata.xml -
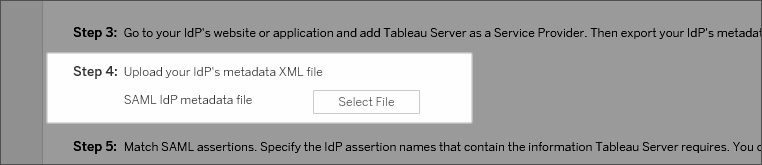
Return to the TSM web UI. For Step 4 in the GUI, enter the path to the IdP metadata file, and then click Select File.
-
For Step 5 in the GUI: In some cases, you may need to change the assertion values in the Tableau Server configuration to match the assertion names that are passed by your IdP.
You can find assertion names in the IdP's SAML configuration. If different assertion names are passed from your IdP, then you must update Tableau Server to use the same assertion value.
Tip: “Assertions” are a key SAML component, and the concept of mapping assertions can be tricky at first. It might help to put this in a tabular-data context, in which the assertion (attribute) name is equivalent to a column heading in the table. You enter that “heading” name, rather than an example of a value that might appear in that column.
-
For Step 6 in the GUI, select the Tableau applications in which you want to give users a single sign-on experience.
Note: The option to disable mobile access is ignored by devices running Tableau Mobile app version 19.225.1731 and higher. To disable SAML for devices running these versions you must disable SAML as a client login option on Tableau Server.
-
For the SAML sign-out redirect, if your IdP supports single logout (SLO), enter the page you want to redirect users to after they sign out, relative to the path you entered for the Tableau Server return URL.
-
(Optional) For Step 7 in the GUI, do the following:
-
Add a comma-separated value for the
AuthNContextClassRefattribute. For more information about how this attribute is used, see SAML compatibility notes and requirements. -
Specify a domain attribute if not sending the domain as part of the username (i.e.,
domain\username). For more information, see When running multiple domains.
-
-
-
Click Save Pending Changes after you've entered your configuration information.
-
Click Pending Changes at the top of the page:

-
Click Apply Changes and Restart.
Before you begin
Before you begin, do the following:
-
Go to your IdP’s website or application, and export the IdP’s metadata XML file.
Confirm that the metadata XML from the IdP includes a SingleSignOnService element, in which the binding is set to
HTTP-POST, as in the following example:<md:SingleSignOnService Binding="urn:oasis:names:tc:SAML:2.0:bindings:HTTP-POST" Location="https://SERVER-NAME:9031/idp/SSO.saml2"/>
-
Gather the certificate files and place them on Tableau Server.
In the Tableau Server folder, create a new folder named SAML, and place copies of the SAML certificate files in that folder. For example:
/var/opt/tableau/tableau_server/data/saml
Step 1: Configure return URL, SAML entity ID, and specify certificate and key files
-
Open the command prompt shell and configure the SAML settings for the server (replacing placeholder values with your environment path and file names).
tsm authentication saml configure --idp-entity-id https://tableau-server --idp-metadata /var/opt/tableau/tableau_server/data/saml/<metadata-file.xml> --idp-return-url https://tableau-server --cert-file /var/opt/tableau/tableau_server/data/saml/<file.crt> --key-file /var/opt/tableau/tableau_server/data/saml/<file.key>For more information, see
tsm authentication saml configure. -
If you are using a PKCS#8 key that is protected with a passphrase, enter the passphrase as follows:
tsm configuration set -k wgserver.saml.key.passphrase -v <passphrase> -
If SAML is not already enabled on Tableau Server; for example, you’re configuring it for the first time, or you have disabled it, enable it now:
tsm authentication saml enable -
Apply the changes:
tsm pending-changes applyIf the pending changes require a server restart, the
pending-changes applycommand will display a prompt to let you know a restart will occur. This prompt displays even if the server is stopped, but in that case there is no restart. You can suppress the prompt using the--ignore-promptoption, but this does not change the restart behavior. If the changes do not require a restart, the changes are applied without a prompt. For more information, see tsm pending-changes apply.
Step 2: Generate Tableau Server metadata and configure the IdP
-
Run the following command to generate the required XML metadata file for Tableau server.
tsm authentication saml export-metadata -f <file-name.xml>You can specify a file name, or omit the
-fparameter to create a default file namedsamlmetadata.xml. -
On your IdP’s website or in its application:
-
Add Tableau Server as a Service Provider.
Refer to your IdP’s documentation for information about how to do this. As part of the process of configuring Tableau Server as a Service Provider, you will import the Tableau Server metadata file you generated from the
export-metadatacommand. -
Confirm that your IdP uses username as the attribute to verify users.
-
Step 3: Match assertions
In some cases, you may need to change the assertion values in the Tableau Server configuration to match the assertion names that are passed by your IdP.
You can find assertion names in the IdP's SAML configuration. If different assertion names are passed from your IdP, then you must update Tableau Server to use the same assertion value.
Tip: “Assertions” are a key SAML component, and the concept of mapping assertions can be tricky at first. It might help to put this in a tabular-data context, in which the assertion (attribute) name is equivalent to a column heading in the table. You enter that “heading” name, rather than an example of a value that might appear in that column.
The following table shows the default assertion values and the configuration key that stores the value.
| Assertion | Default value | Key |
|---|---|---|
| Username | username
|
wgserver.saml.idpattribute.username
|
| Display name | displayName
|
Tableau does not support this attribute type. |
email
|
Tableau does not support this attribute type. |
|
| Domain | (not mapped by default) | wgserver.saml.idpattribute.domain
|
To change a given value, run the tsm configuration set command with the appropriate key:value pair.
For example, to change the username assertion to the value, name, run the following commands:
tsm configuration set -k wgserver.saml.idpattribute.username -v name
tsm pending-changes apply
Alternatively, you can use the tsm authentication saml map-assertions command to change a given value.
For example, to set the domain assertion to a value called domain and specify its value as "example.myco.com," run the following commands:
tsm authentication saml map-assertions --domain example.myco.com
tsm pending-changes apply
Optional: Disable client types from using SAML
By default, both Tableau Desktop and the Tableau Mobile app allow SAML authentication.
If your IdP does not support this functionality, you can disable SAML sign-in for Tableau clients using the following commands:
tsm authentication saml configure --desktop-access disable
tsm authentication saml configure --mobile-access disable
Note: The --mobile-access disable option is ignored by devices running Tableau Mobile app version 19.225.1731 and higher. To disable SAML for devices running these versions you must disable SAML as a client login option on Tableau Server.
tsm pending-changes apply
Optional: Add AuthNContextClassRef value
Add a comma-separated value for the AuthNContextClassRef attribute. For more information about how this attribute is used, see SAML compatibility notes and requirements.
To set this attribute run the following commands:
tsm configuration set -k wgserver.saml.authcontexts -v <value>
tsm pending-changes apply
Test the configuration
-
In your web browser, open a new page or tab, and enter the Tableau Server URL.
The browser redirects you to the IdP’s sign-in form.
-
Enter your single sign-on user name and password.
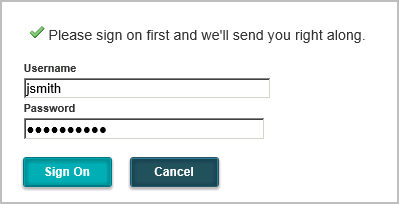
The IdP verifies your credentials and redirects you back to your Tableau Server start page.