Example: Install and Configure a Three-Node HA Cluster
A multi-node high availability installation of Tableau Server can help to maximize the efficiency and availability of Tableau Server. When configuring a multi-node Tableau Server deployment, the steps you perform are designed to build in redundancy, helping to reduce your potential downtime. In addition to simply improving efficiency by moving or adding server processes to additional nodes, you can create a highly available (HA) installation of Tableau Server by satisfying these requirements:
- Add additional nodes for a total of at least three nodes
- Deploy a Coordination Service ensemble on at least three nodes
- Add an instance of Client File Service (CFS) on at least one additional node (we recommend adding an instance on each node running the Coordination Service)
- Add a second instance of the File Store on one of the additional nodes (Data Engine will be installed automatically, if it is not already on the node)
- Add a second instance of the Repository (pgsql) on one of the additional nodes
A Tableau Server installation that includes these additions will have built-in redundancy and can support failover in the event of a problem with the repository. This example shows how to do this, and more.
A Single Server System
After installing Tableau Server on an initial node, you have a system that is running everything it needs to function. It has at least one instance of all server processes and is the most basic configuration of Tableau Server. It has no redundancy. The server topology looks like this (some TSM-specific processes are not shown):

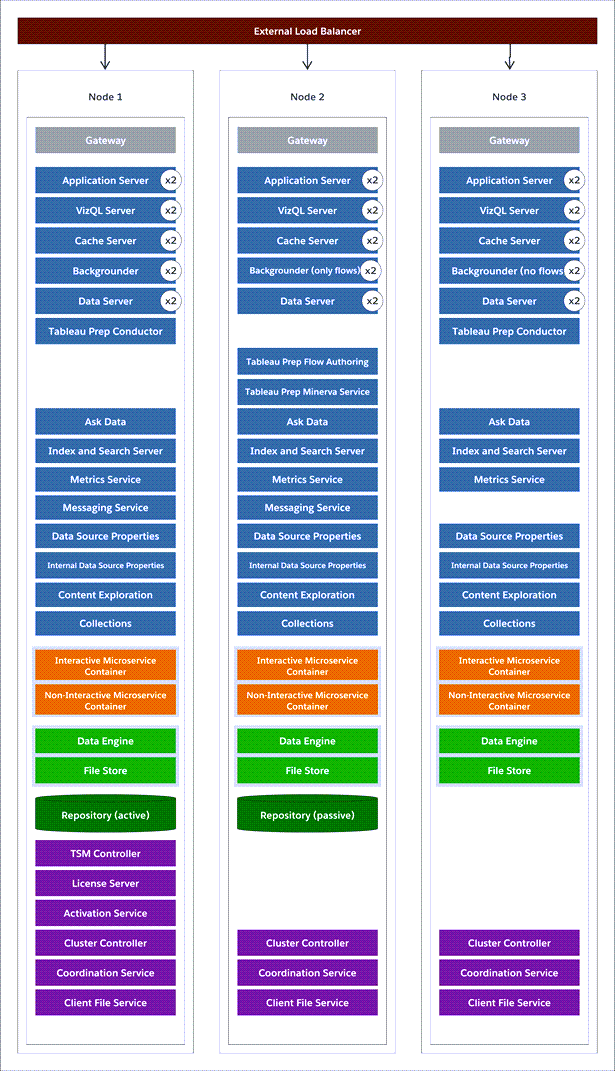
A Three-Node System
To build in redundancy, you need to add additional nodes to host instances of the repository and the data engine and file store processes. You can add instances of other processes, including multiple instances of a process on a node. In addition, to reduce the system’s vulnerability, you can run multiple gateways and additional instances of some of the server processes. The fewest number of computers required to achieve this configuration is three.
In the diagram below, the file store process has been added to both additional nodes. A second, passive instance of the repository has also been added to one of the other new nodes. Finally, the server processes (shown in blue) have been added to the additional nodes to provide redundancy.
Configuration steps
This procedure describes how to configure a three-node HA Tableau Server cluster with two repository instances and two file store/data engine instances on the additional nodes as pictured above.
Before you begin
Before you install Tableau Server on any additional nodes, ensure that each additional node meets the distributed requirements. See Distributed Requirements for details.
Note: This operation includes steps that you may need to perform using the TSM command line.
Step 1: Install the initial node
See Install and Configure Tableau Server.
Step 2: Generate a bootstrap file for the additional nodes
-
Open TSM in a browser:
https://<tsm-computer-name>:8850For more information, see Sign in to Tableau Services Manager Web UI.
-
Click the Configuration tab, and in the Add a Node box, click Download Bootstrap File.

The bootstrap file is created and copied to your local computer.
Embedded credentials are included in the bootstrap file by default. If you don't want credentials embedded in the bootstrap file, clear the Include temporary credentials in file option. If you want to completely disable the ability to include embedded credentials in node bootstrap files, you can set a configuration option for the server. See features.PasswordlessBootstrapInit for more details.
Step 3: Install and initialize node 2
-
Copy the original installer you used on the first computer along with the bootstrap file you generated and put them in a location accessible from the new computer you are adding Tableau Server to. This could be a mounted network share, or directly on the new computer.
-
If you are running a local firewall, then you need to configure firewall rules for all the nodes in the cluster.
-
On the new node, run the Tableau Server Setup program:
Use the package manager to install the Tableau Server package.
You must install the new version to the same location as the existing version. The install location must be the same on all nodes. Do not install to a location using a symbolic link or to a directory on a Network File System (NFS) volume.
-
On RHEL-like distributions, including CentOS, you have the option to install Tableau to a non-default location.
-
Default location—To install to the default location (
/opt/tableau/tableau_server), run the following commands, where<version>is formatted as major-minor-maintenance (ex:2019-2-5):sudo yum updatesudo yum install tableau-server-<version>.x86_64.rpm -
Non-default location—To install to a non-default location, you must use
rpm -i. You will also need to install all dependent packages. See the note below.Run the following command:
sudo rpm -i --prefix /preferred/install/path tableau-server.rpm
Note: When you use
yumto install Tableau Server, all dependent packages are automatically downloaded and installed. This is the preferred method for installing Tableau. If you want to install to a non-default location, or your organization does not allow you to useyumand you must install usingrpm -i, you must also install all dependent packages separately. For information about installing dependent packages, see Installing Tableau Server on an Air-Gapped Computer Running Linux. -
-
On Ubuntu, run the following commands, where
<version>is formatted as major-minor-maintenance (ex:2019-2-5):sudo apt-get update sudo apt-get upgrade sudo apt-get -y install gdebi-core sudo gdebi -n tableau-server-<version>_amd64.deb
-
-
To initialize communications between your new node and the initial node, run the initialize-tsm script that is installed when you install Tableau Server.
Navigate to the
scriptsdirectory:cd /opt/tableau/tableau_server/packages/scripts.<version_code>/
-
Run the initialize-tsm script:
sudo ./initialize-tsm -b /path/to/<bootstrap>.json --accepteula-
Use the
-bflag to provide the path to the bootstrap file that you copied to the computer. If you have encrypted the bootstrap file, then you must pipe the file as described in Securing secrets for import and export operations. -
If the bootstrap file was generated without embedded credentials, use the
-uflag to specify the user name of the administrative user on the initial node. This is the name of an administrative user on the computer, not the Tableau Server administrator. You will be prompted for the user password. For more information, see tsm topology nodes get-bootstrap-file.sudo ./initialize-tsm -b /path/to/<bootstrap>.json -u <admin-user-on-first-node> --accepteulaImportant: You must enter the credentials of the same user that you used during the installation process on the initial node.
-
The
--accepteulaflag accepts the Tableau Server End User License Agreement (EULA). The EULA is available in the following location: End User License Agreement. (Link opens in a new window)
-
Step 4: Install and initialize node 3
Repeat Step 3 above.
Step 5: Configure the new node with a minimum topology
To complete the process of adding new nodes to your cluster, you need to configure them with a minimum topology. With a minimum topology, the only pending change will be the addition of Cluster Controller, which is required on each node. If you want other processes on the nodes you can add most of them at the same time. This example only configures the nodes with Cluster Controller.
-
Open TSM in a browser:
https://<tsm-computer-name>:8850For more information, see Sign in to Tableau Services Manager Web UI.
-
Click the Configuration tab. A message should tell you that new nodes were added.
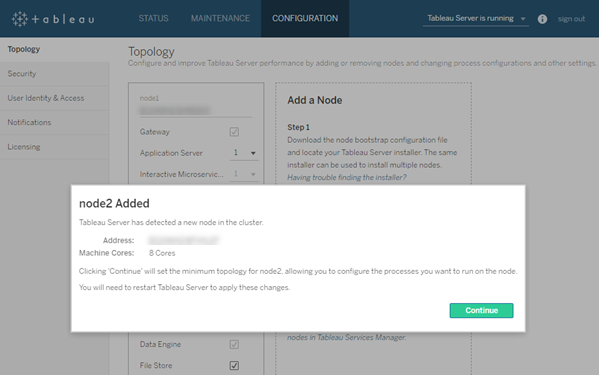
Click Continue to dismiss the message.
-
Click Pending Changes at the top of the page:

If you are configuring a cluster with three or more nodes, a Coordination Service ensemble warning displays. You can continue. You will deploy a Coordination Service ensemble in a separate step.
-
Click Apply Changes and Restart and Confirm to confirm a restart of Tableau Server.
When Tableau Server restarts, the nodes are included with the minimum topology necessary.
Step 6: Deploy a Coordination Service ensemble
If you install a total of three or more nodes, you should also deploy a Coordination Service ensemble. If you do not, you will get a warning message every time you make changes to the server configuration or topology. You can ignore this message, but as a best practice you should deploy a multi-node Coordination Service ensemble.
When you install Tableau Server, a single instance of the Coordination Service is installed on the initial node. TSM and Tableau Server depend on the Coordination Service to function properly, so to provide redundancy and ensure availability on multi-node installations, configure additional instances of the Coordination Service by deploying a Coordination Service ensemble. Coordination Service ensembles are installed with one, three, or five instances of the Coordination Service. In a three-node installation of Tableau Server, the recommended number of Coordination Service instances is three, one on each node.
Do not attempt to deploy a Coordination Service ensemble if there are other changes pending. Discard or apply any pending changes before deploying a new Coordination Service ensemble.
Note: This operation includes steps that you may need to perform using the TSM command line.
The following steps illustrate how to deploy a new Coordination Service ensemble on an existing three-node Tableau Server cluster and clean up the old ensemble.
-
On the initial node, open a terminal session.
-
Stop Tableau Server:
tsm stopIf prompted, sign in as a TSM administrator.
Some TSM processes will continue to run, including the Administration Controller and Administration Agent.
-
Confirm there are no pending changes:
tsm pending-changes listIf there are pending changes, you need to either discard the changes or apply them. Applying pending changes will take some time:
-
Discard the changes
tsm pending-changes discard
-
Apply the changes:
tsm pending-changes apply
or
Wait until the command completes and you are returned to the system prompt.
-
-
Get the node IDs for each node in the cluster:
tsm topology list-nodes -v -
Use the
tsm topology deploy-coordination-servicecommand to add a new Coordination Service ensemble by adding the Coordination Service to specified nodes. You must specify the node(s) that the Coordination Service should be added to, using the actual node ID to identify each node. The command also makes the new ensemble the "production" ensemble (the ensemble in use) and removes the old ensemble, unless the deployment fails. If this happens, see step 6 below.Note: A "y/n" prompt displays confirming that a server restart will take place. To run the command without input, include the
--ignore-promptoption.For example, deploy the Coordination Service to all three nodes of a three-node cluster, where the nodes are node1, node2, and node3:
tsm topology deploy-coordination-service -n node1,node2,node3Wait until the command completes and you are returned to the system prompt.
-
(Optional) If the deployment fails, you need to run the
tsm topology cleanup-coordination-servicecommand to remove the unsuccessfully deployed ensemble. For details on running the command, see tsm topology cleanup-coordination-service. -
Start Tableau Server:
tsm start
For more information and details on deploying a new Coordination Service ensemble, see Deploy a Coordination Service Ensemble .
Step 7: Configure Client File Services (CFS) on additional nodes
Add CFS to additional nodes. We recommend you add CFS to every node running the Coordination Service.
Note: This operation includes steps that you may need to perform using the TSM command line.
-
On the initial node, open a terminal session.
-
Find the node ID for the node you are adding CFS to:
tsm topology list-nodes -v -
Add CFS on the node by specifying the node, the process, and a single instance.
For example, this command adds an instance of CFS to node2:
tsm topology set-process -n node2 -pr clientfileservice -c 1If you attempt to add an instance of CFS to a node that already is configured with CFS, an error message will let you know there is already an instance on the node.
To add CFS to additional nodes, repeat this step for each node.
-
Apply the changes:
tsm pending-changes apply
Step 8: Configure processes for node 2
-
Open TSM in a browser:
https://<tsm-computer-name>:8850For more information, see Sign in to Tableau Services Manager Web UI.
-
Click the Configuration tab.
-
Specify the processes and number of instances that should run on the first additional node.
In this example:
-
Select Gateway.
-
Set the Application Server (vizportal) count to 2.
-
Set the VizQL Server count to 2.
-
Set the Cache Server count to 2.
-
Set the Backgrounder count to 2.
Adding Backgrounder to a node will also add an instance of Data Engine if one is not already on the node.
-
Set the Data Server count to 2.
-
Select File Store.
-
Select Repository (pgsql).
-
Select Metrics Service. (The legacy Metrics feature was retired in February 2024 for Tableau Cloud and will be retired in Tableau Server version 2024.2. For more information, see Create and Troubleshoot Metrics (Retired).)
-
Select Messaging Service.
-
Select Data Source Properties.
-
Select Content Exploration Service.
-
Select Collections Service.
-
Select Search and Index Server.
The specific processes and process counts you set will depend on your organizational environment and needs. Some processes are added automatically when you add another process. For more information, see Configure Nodes and Tableau Server Processes.
Note: The TSM Web UI limits you to a maximum of 8 instances of processes that allow you to select the number of instances. To configure more instances than this, use the command line and the
TSM topology set-processcommand. For more information, see tsm topology set-process. -
Step 9: Configure processes for node 3
-
In TSM, on the Configuration tab, specify the processes and number of instances that should run on the second additional node.
In this example:
-
Select Gateway.
-
Set the Application Server (vizportal) count to 2.
-
Set the VizQL Server count to 2.
-
Set the Cache Server count to 2.
-
Set the Backgrounder count to 2.
Adding Backgrounder to a node will also add an instance of Data Engine if one is not already on the node.
-
Set the Data Server count to 2.
-
Select File Store.
-
Select Metrics Service. (The legacy Metrics feature was retired in February 2024 for Tableau Cloud and will be retired in Tableau Server version 2024.2. For more information, see Create and Troubleshoot Metrics (Retired).)
-
Select Data Source Properties.
-
Select Content Exploration Service.
-
Select Collections Service.
-
Select Search and Index Server.
-
-
Click Pending Changes at the top of the page:
The Pending Changes list displays.
- Click Apply Changes and Restart and Confirm to confirm a restart of Tableau Server.
Step 1: Install the initial node
See Install and Configure Tableau Server.
Step 2: Generate a bootstrap file for the additional nodes
To install Tableau Server on additional computers you use the same installer you did for the initial node, along with a "bootstrap" file you generate on the initial node.
Important: The bootstrap file contains a copy of the master keystore file used for encrypting the configuration secrets. The file can also embedded credentials which are valid for a predetermined amount of time (see tabadmincontroller.auth.expiration.minutes) and serve as a session cookie. We strongly recommend that you take additional measures to secure the bootstrap file.
The following command set provides an example method to encrypt the bootstrap file output. This method is similar to the encryption process described in more detail at Securing secrets for import and export operations.
Note however, the method here must be passed as separate arguments with trailing && \ operators as follows:
mkfifo -m 600 /tmp/secure1 && \
tsm topology nodes get-bootstrap-file --file /tmp/secure1 && \
gpg --symmetric --batch --yes --passphrase-file ~/.secrets/pgppassphrase.txt --cipher-algo AES256 --output encrypted.enc < /tmp/secure1 && \
rm /tmp/secure1
-
After installing Tableau Server on the initial node, generate the node bootstrap file.
-
On the initial node, open a terminal session.
-
Type this command to generate the bootstrap file:
tsm topology nodes get-bootstrap-file --file <path\file>.jsonEmbedded credentials are included in the bootstrap file by default. If you don't want the bootstrap file to include credentials, use the
-necor--no-embedded-credentialsoption:tsm topology nodes get-bootstrap-file --file <path\file>.json --no-embedded-credentials.If you want to completely disable the ability to include embedded credentials in node bootstrap files, you can set a configuration option for the server. See features.PasswordlessBootstrapInit for more details.
Step 3: Install and initialize node 2
-
Copy the original installer you used on the first computer along with the bootstrap file you generated and put them in a location accessible from the new computer you are adding Tableau Server to. This could be a mounted network share, or directly on the new computer.
-
If you are running a local firewall, then you need to configure firewall rules for all the nodes in the cluster.
-
On the new node, run the Tableau Server Setup program:
Use the package manager to install the Tableau Server package.
You must install the new version to the same location as the existing version. The install location must be the same on all nodes. Do not install to a location using a symbolic link or to a directory on a Network File System (NFS) volume.
-
On RHEL-like distributions, including CentOS, you have the option to install Tableau to a non-default location.
-
Default location—To install to the default location (
/opt/tableau/tableau_server), run the following commands, where<version>is formatted as major-minor-maintenance (ex:2019-2-5):sudo yum updatesudo yum install tableau-server-<version>.x86_64.rpm -
Non-default location—To install to a non-default location, you must use
rpm -i. You will also need to install all dependent packages. See the note below.Run the following command:
sudo rpm -i --prefix /preferred/install/path tableau-server.rpm
Note: When you use
yumto install Tableau Server, all dependent packages are automatically downloaded and installed. This is the preferred method for installing Tableau. If you want to install to a non-default location, or your organization does not allow you to useyumand you must install usingrpm -i, you must also install all dependent packages separately. For information about installing dependent packages, see Installing Tableau Server on an Air-Gapped Computer Running Linux. -
-
On Ubuntu, run the following commands, where
<version>is formatted as major-minor-maintenance (ex:2019-2-5):sudo apt-get update sudo apt-get upgrade sudo apt-get -y install gdebi-core sudo gdebi -n tableau-server-<version>_amd64.deb
-
-
To initialize communications between your new node and the initial node, run the initialize-tsm script that is installed when you install Tableau Server.
On the new node:
Navigate to the
scriptsdirectory:cd /opt/tableau/tableau_server/packages/scripts.<version_code>/
-
Run the initialize-tsm script:
sudo ./initialize-tsm -b /path/to/<bootstrap>.json --accepteula-
Use the
-bflag to provide the path to the bootstrap file that you copied to the computer. If you have encrypted the bootstrap file, then you must pipe the file as described in Securing secrets for import and export operations. -
If the bootstrap file was generated without embedded credentials, use the
-uflag to specify the user name of the administrative user on the initial node. This is the name of an administrative user on the computer, not the Tableau Server administrator. You will be prompted for the user password. For more information, see tsm topology nodes get-bootstrap-file.sudo ./initialize-tsm -b /path/to/<bootstrap>.json -u <admin-user-on-first-node> --accepteulaImportant: You must enter the credentials of the same user that you used during the installation process on the initial node.
-
The
--accepteulaflag accepts the Tableau Server End User License Agreement (EULA). The EULA is available in the following location:/opt/tableau/tableau_server/packages/docs.<version_code>/EULA.rtf
-
Step 4: Install and initialize node 3
Install Tableau Server on node 3:
-
Copy the original installer you used on the first computer along with the bootstrap file you generated and put them in a location accessible from the new computer you are adding Tableau Server to. This could be a mounted network share, or directly on the new computer.
-
If you are running a local firewall, then you need to configure firewall rules for all the nodes in the cluster.
-
On the new node, run the Tableau Server Setup program:
Use the package manager to install the Tableau Server package.
You must install the new version to the same location as the existing version. The install location must be the same on all nodes. Do not install to a location using a symbolic link or to a directory on a Network File System (NFS) volume.
-
On RHEL-like distributions, including CentOS, you have the option to install Tableau to a non-default location.
-
Default location—To install to the default location (
/opt/tableau/tableau_server), run the following commands, where<version>is formatted as major-minor-maintenance (ex:2019-2-5):sudo yum updatesudo yum install tableau-server-<version>.x86_64.rpm -
Non-default location—To install to a non-default location, you must use
rpm -i. You will also need to install all dependent packages. See the note below.Run the following command:
sudo rpm -i --prefix /preferred/install/path tableau-server.rpm
Note: When you use
yumto install Tableau Server, all dependent packages are automatically downloaded and installed. This is the preferred method for installing Tableau. If you want to install to a non-default location, or your organization does not allow you to useyumand you must install usingrpm -i, you must also install all dependent packages separately. For information about installing dependent packages, see Installing Tableau Server on an Air-Gapped Computer Running Linux. -
-
On Ubuntu, run the following commands, where
<version>is formatted as major-minor-maintenance (ex:2019-2-5):sudo apt-get update sudo apt-get upgrade sudo apt-get -y install gdebi-core sudo gdebi -n tableau-server-<version>_amd64.deb
-
-
To initialize communications between your new node and the initial node, run the initialize-tsm script that is installed when you install Tableau Server.
On the new node:
Navigate to the
scriptsdirectory:cd /opt/tableau/tableau_server/packages/scripts.<version_code>/
-
Run the initialize-tsm script:
sudo ./initialize-tsm -b /path/to/<bootstrap>.json --accepteula-
Use the
-bflag to provide the path to the bootstrap file that you copied to the computer. If you have encrypted the bootstrap file, then you must pipe the file as described in Securing secrets for import and export operations. -
If the bootstrap file was generated without embedded credentials, use the
-uflag to specify the user name of the administrative user on the initial node. This is the name of an administrative user on the computer, not the Tableau Server administrator. You will be prompted for the user password. For more information, see tsm topology nodes get-bootstrap-file.sudo ./initialize-tsm -b /path/to/<bootstrap>.json -u <admin-user-on-first-node> --accepteulaImportant: You must enter the credentials of the same user that you used during the installation process on the initial node.
-
The
--accepteulaflag accepts the Tableau Server End User License Agreement (EULA). The EULA is available in the following location:/opt/tableau/tableau_server/packages/docs.<version_code>/EULA.rtf
-
Step 5: Add a process to the additional nodes
-
On the initial node, configure a cluster controller instance on each additional node:
tsm topology set-process -n <nodeID_second-node> -pr clustercontroller -c 1tsm topology set-process -n <nodeID_third-node> -pr clustercontroller -c 1 -
Apply the node configuration changes:
tsm pending-changes apply --ignore-warningsA warning about deploying a Coordination Service ensemble displays because you have deployed a three-node cluster. Use the
--ignore-warningsoption to apply the configuration changes in spite of the warning. You will deploy a new Coordination Service ensemble in the next step.
Step 6: Deploy a Coordination Service ensemble
If you install a total of three or more nodes, you should also deploy a Coordination Service ensemble. If you do not, you will get a warning message every time you make changes to the server configuration or topology. You can ignore this message, but as a best practice you should deploy a multi-node Coordination Service ensemble.
When you install Tableau Server, a single instance of the Coordination Service is installed on the initial node. TSM and Tableau Server depend on the Coordination Service to function properly, so to provide redundancy and ensure availability on multi-node installations, configure additional instances of the Coordination Service by deploying a Coordination Service ensemble. Coordination Service ensembles are installed with one, three, or five instances of the Coordination Service. In a three-node installation of Tableau Server, the recommended number of Coordination Service instances is three, one on each node.
Do not attempt to deploy a Coordination Service ensemble if there are other changes pending. Discard or apply any pending changes before deploying a new Coordination Service ensemble.
Note: This operation includes steps that you may need to perform using the TSM command line.
The following steps illustrate how to deploy a new Coordination Service ensemble on an existing three-node Tableau Server cluster and clean up the old ensemble.
-
On the initial node, open a terminal session.
-
Stop Tableau Server:
tsm stopIf prompted, sign in as a TSM administrator.
Some TSM processes will continue to run, including the Administration Controller and Administration Agent.
-
Confirm there are no pending changes:
tsm pending-changes listIf there are pending changes, you need to either discard the changes or apply them. Applying pending changes will take some time:
-
Discard the changes
tsm pending-changes discard
-
Apply the changes:
tsm pending-changes apply
or
Wait until the command completes and you are returned to the system prompt.
-
-
Get the node IDs for each node in the cluster:
tsm topology list-nodes -v -
Use the
tsm topology deploy-coordination-servicecommand to add a new Coordination Service ensemble by adding the Coordination Service to specified nodes. You must specify the node(s) that the Coordination Service should be added to, using the actual node ID to identify each node. The command also makes the new ensemble the "production" ensemble (the ensemble in use) and removes the old ensemble, unless the deployment fails. If this happens, see step 6 below.Note: A "y/n" prompt displays confirming that a server restart will take place. To run the command without input, include the
--ignore-promptoption.For example, deploy the Coordination Service to all three nodes of a three-node cluster, where the nodes are node1, node2, and node3:
tsm topology deploy-coordination-service -n node1,node2,node3Wait until the command completes and you are returned to the system prompt.
-
(Optional) If the deployment fails, you need to run the
tsm topology cleanup-coordination-servicecommand to remove the unsuccessfully deployed ensemble. For details on running the command, see tsm topology cleanup-coordination-service. -
Start Tableau Server:
tsm start
For more information and details on deploying a new Coordination Service ensemble, see Deploy a Coordination Service Ensemble .
Step 7: Configure Client File Services (CFS) on additional nodes
Add CFS to additional nodes. We recommend you add CFS to every node running the Coordination Service.
Note: This operation includes steps that you may need to perform using the TSM command line.
-
On the initial node, open a terminal session.
-
Find the node ID for the node you are adding CFS to:
tsm topology list-nodes -v -
Add CFS on the node by specifying the node, the process, and a single instance.
For example, this command adds an instance of CFS to node2:
tsm topology set-process -n node2 -pr clientfileservice -c 1If you attempt to add an instance of CFS to a node that already is configured with CFS, an error message will let you know there is already an instance on the node.
To add CFS to additional nodes, repeat this step for each node.
-
Apply the changes:
tsm pending-changes apply
Step 8: Configure processes for node 2
-
On the initial node, set the topology for node 2. The topology specifies which processes should run on the node, and how many instances of each process should run. For details about configuring nodes, see Configure Nodes. Data engine will be added automatically when you add other processes. For details on when data engine is added, see Tableau Server Processes.
- Get the node-id for the new node:
tsm topology list-nodes -v -
Specify individual processes that will run on the new node:
tsm topology set-process -n <node-id> -pr gateway -c 1tsm topology set-process -n <node-id> -pr vizqlserver -c 2tsm topology set-process -n <node-id> -pr vizportal -c 2tsm topology set-process -n <node-id> -pr backgrounder -c 2tsm topology set-process -n <node-id> -pr cacheserver -c 2tsm topology set-process -n <node-id> -pr indexandsearchserver -c 1tsm topology set-process -n <node-id> -pr dataserver -c 2tsm topology set-process -n <node-id> -pr filestore -c 1tsm topology set-process -n <node-id> -pr pgsql -c 1tsm topology set-process -n <node-id> -pr metrics -c 1tsm topology set-process -n <node-id> -pr activemqserver -c 1tsm topology set-process -n <node-id> -pr tdsservice -c 1tsm topology set-process -n <node-id> -pr contentexploration -c 1tsm topology set-process -n <node-id> -pr collections -c 1
- Get the node-id for the new node:
-
Apply the node configuration changes. You will be prompted with a message that Tableau Server will restart.
tsm pending-changes apply
Step 9: Configure processes for node 3
On the initial node, set the topology for node 3. The topology specifies which processes should run on the node, and how many instances of each process should run. Data engine will be added automatically when you add other processes. For details on when data engine is added, see Tableau Server Processes.
-
Get the node-id for the new node:
tsm topology list-nodes -v -
Specify individual processes that will run on the new node:
tsm topology set-process -n <node-id> -pr gateway -c 1tsm topology set-process -n <node-id> -pr vizqlserver -c 2tsm topology set-process -n <node-id> -pr vizportal -c 2tsm topology set-process -n <node-id> -pr backgrounder -c 2tsm topology set-process -n <node-id> -pr cacheserver -c 2tsm topology set-process -n <node-id> -pr indexandsearchserver -c 1tsm topology set-process -n <node-id> -pr dataserver -c 2tsm topology set-process -n <node-id> -pr filestore -c 1tsm topology set-process -n <node-id> -pr metrics -c 1tsm topology set-process -n <node-id> -pr tdsservice -c 1tsm topology set-process -n <node-id> -pr contentexploration -c 1tsm topology set-process -n <node-id> -pr collections -c 1 -
Apply the node configuration. You will be prompted with a message that Tableau Server will restart.
tsm pending-changes apply -
Start the server:
tsm start
Step 10: Configure firewall rules (optional)
If you are running a local firewall, then you need to configure firewall rules for all the nodes in the cluster. For more information, see Local firewall configuration
Add a Load Balancer
At this point, all three nodes have gateways, which are used to route requests to available server processes. All gateways are active, but to further reduce the potential for downtime in the cluster, you can configure a load balancer. For more information, see Add a Load Balancer.