Change Salesforce.com OAuth to Saved Credentials
By default, the Salesforce.com connector uses a managed keychain for OAuth tokens that are generated for Tableau Server by the data provider and shared by all users in the same site. You can configure Tableau Server with saved client ID and client secret. There are three scenarios where you might want to do this:
- Salesforce connector—If you're using the Salesforce connector, you can configure Tableau Server with an OAuth client ID and secret, so the connector can use saved credentials.
- Write to CRM Analytics—If you're writing Tableau Prep flow data to Salesforce CRM Analytics (version 2022.3 and later), configure Tableau Server with an OAuth client ID and secret, so the flow can run in Tableau Server using saved credentials.
- Einstein Discovery—If you are integrating Einstein Discovery extensions with Tableau Server, you need to do this OAuth client ID and secret configuration. The ability to integrate Einstein Discovery and Tableau Server was added in version 2021.1.0. For more information, see Configure Einstein Discovery Integration.
This topic describes how to set up your Salesforce.com data sources and Einstein Discovery extensions for OAuth saved credentials. Complete these steps for each Tableau Server instance.
For more information about managed keychain and saved credentials, see OAuth Connections
Notes:
- The Salesforce connector requires managed keychain (default), server-wide OAuth, or site-specific OAuth.
- To use saved credentials for a site, server-wide OAuth must be configured first.
- Server-wide OAuth can be used whether site-wide OAuth is configured.
- If using site-specific OAuth, each site must be configured individually.
- To support live connection prompts, editing connections, and web authoring, convert managed keychain to saved credentials to avoid errors.
Summary of steps
Set up OAuth by following these general steps:
- Create a Connected App in Salesforce.
- Use the information you obtained in step 1 to configure Tableau Server.
- (Optional) Configure site-specific OAuth.
Step 1: Create a Salesforce connected app
Note: This procedure documents the process in Salesforce Lightning. If you are using the traditional interface, the navigation may be different but the configuration is the same.
-
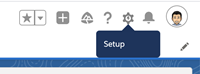
Sign in to your Salesforce.com developer account, click your user name in the upper-right, and then select Setup.
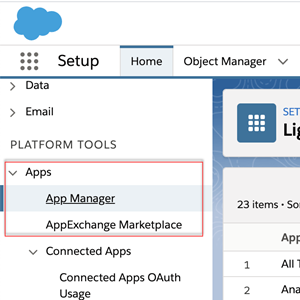
-
In the left navigation column, under Apps, select App Manager.
-
In the Connected Apps section, click New Connected App.

-
In Basic Information, give the app a name, tab through the api field so it will self-populate in the correct format, and enter a contact email for the app.
-
In the API [Enable OAuth Settings] section, select Enable OAuth Settings.
-
In the new OAuth settings that appear, for Callback URL, type the fully qualified domain name of your server, using the
httpsprotocol, and append the following text to the URL:auth/add_oauth_token.For example:
https://www.your_tableau_server.com/auth/add_oauth_token -
Move the following items from Available OAuth Scopes to Selected OAuth Scopes:
- Access the identity URL service (id, profile, email, address, phone)
- Manage user data via APIs (api)
- Perform requests any time (refresh_token, offline access)
-
Click Save.
After you save the app, Salesforce populates the API section with the following IDs that you will use to configure Tableau Server:
- Consumer Key
- Consumer Secret
- Callback URL

Step 2: Configure Tableau Server for Salesforce.com OAuth
Once your connected app is created in Salesforce and you have the Customer Key, Customer Secret, and the Callback URL, you can configure Tableau Server for Salesforce data connections and outputs, and Einstein Discovery.
-
On the Tableau Server computer, at a command prompt, run the following commands:
tsm configuration set -k oauth.salesforce.client_id -v <your_customer_key>tsm configuration set -k oauth.salesforce.client_secret -v <your_customer_secret>tsm configuration set -k oauth.salesforce.redirect_uri -v <your_redirect_URL> -
(Optional) To change the default login server, type the following command:
tsm configuration set -k oauth.salesforce.server_base_url -v <URL> -
Enter the following command to apply changes:
tsm pending-changes applyIf the pending changes require a server restart, the
pending-changes applycommand will display a prompt to let you know a restart will occur. This prompt displays even if the server is stopped, but in that case there is no restart. You can suppress the prompt using the--ignore-promptoption, but this does not change the restart behavior. If the changes do not require a restart, the changes are applied without a prompt. For more information, see tsm pending-changes apply.
Configure custom OAuth for a site
You can configure a custom Salesforce OAuth client for a site.
Consider configuring a custom OAuth client to 1) override an OAuth client if configured for the server or 2) enable support for securely connecting to data that requires unique OAuth clients.
When a custom OAuth client is configured, the site-level configuration takes precedence over any server-side configuration and all new OAuth credentials created use the site-level OAuth client by default. No Tableau Server restart is required for the configurations to take effect.
Important: Existing OAuth credentials established before the custom OAuth client is configured are temporarily usable but both server administrators and users must update their saved credentials to help ensure uninterrupted data access.
Step 1: Prepare the OAuth client ID, client secret, and redirect URL
Before you can configure the custom OAuth client, you need the information listed below. After you have this information prepared, you can register the custom OAuth client for the site.
-
OAuth client ID and client secret: First register the OAuth client with the data provider (connector) to retrieve the client ID and secret generated for Tableau Server.
-
Redirect URL: Note the correct redirect URL. You will need this during the registration process in Step 2 below.
https://<your_server_name>.com/auth/add_oauth_token
For example, https://example.com/auth/add_oauth_token
Step 2: Register the OAuth client ID and client secret
Follow the procedure described below to register the custom OAuth client to the site.
-
Sign in to your Tableau Server site using your admin credentials and navigate to the Settings page.
-
Under OAuth Clients Registry, click the Add OAuth Client button.
-
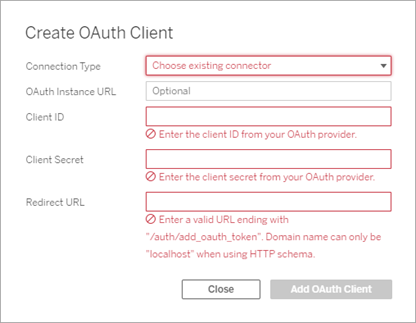
Enter the required information, including the information from Step 1 above:
-
For Connection Type, select the connector whose custom OAuth client you want to configure.
-
For Client ID, Client Secret, and Redirect URL, enter the information you prepared in Step 1 above.
-
Click the Add OAuth Client button to complete the registration process.
-
-
(Optional) Repeat step 3 for all supported connectors.
- Click the Save button at the bottom or top of the Settings page to save changes.
Step 3: Validate and update saved credentials
To help ensure uninterrupted data access, you (and your site users) must delete the previous saved credentials and add it again to use the custom OAuth client for the site.
-
Navigate to your My Account Settings page.
-
Under Saved Credentials for Data Sources, do the following:
-
Click Delete next to the existing saved credentials for the connector whose custom OAuth client you configured in Step 2 above.
-
Next to connector name, click Add and follow the prompts to 1) connect to the custom OAuth client configured in Step 2 above and 2) save the latest credentials.
-
Step 4: Notify users to update their saved credentials
Make sure you notify your site users to update their saved credentials for the connector whose custom OAuth client you configured in Step 2 above. Site users can use the procedure described in Update saved credentials to update their saved credentials.
Manage access tokens
After you configure the server for OAuth, you can allow users to manage their own access tokens in their profile settings, or you can manage the tokens centrally. For more information, see Allow Saved Access Tokens.
Forward proxy for OAuth authentication
For more information about setting up a forward proxy with OAuth authentication for Tableau Server (Windows only), see Configure a Forward Proxy for OAuth Authentication(Link opens in a new window) in the Tableau Help.