Set Up a Bridge Refresh Schedule
This topic describes how a Tableau data source owner can set up and update refresh schedules for data sources that connects to private network data. Refresh schedules for data sources that connect to private network data rely on Tableau Bridge. The tasks described in this topic assume Bridge has been set up and is being maintained by your site admin. Exceptions are noted.
This topic does not cover setting up refresh schedules for virtual connections. For more information about virtual connections, see Schedule Extract Refreshes for a Virtual Connection.
Notes:
- Bridge supports keeping data fresh for data sources embedded in workbooks. See Using Embedded Data Sources.
- To set up and configure refresh schedules for a private cloud-based data sources, see Use Bridge for Private Cloud Data.
Online schedules versus Bridge (legacy) schedules
For data sources that are set up to use extract connections, Bridge uses refresh schedules to keep data fresh.
There are two types of refresh schedules that you can configure for Bridge to use:
- Refresh schedules in Online
- Bridge (legacy)
Note: Bridge (legacy) schedules do not support refreshes for virtual connections.
The schedule you use can depend on a couple of factors, including the version the original schedule was created and the type of underlying data that the data source connects to. In summary, Online schedules are designed to leave client management tasks to the site admin and enable you to perform all your data source management tasks directly on Tableau Cloud.
Version
Beginning with Bridge 2021.4.3, extract refreshes for file-based data sources can use Online schedules. Online schedules for file-based data sources require at least one Bridge 2021.4.3 (or later) client be set up and added to the client pool by your site admin.
By default, schedules created for file-based data sources that were created prior to Bridge 2021.4.3 use Bridge (legacy) schedules. Bridge (legacy) schedules can be converted to Online schedules.
Compare schedules
The following table delineates the primary differences between Online and Bridge (legacy) schedules for keeping private network data fresh.
| Online Schedule | Bridge (Legacy) Schedule | |
| Supported data types |
Relational data File data Private cloud data |
Relational data File data |
| Content management |
Data source page Virtual connection page |
Data source page + designated client |
| Scheduling | Integrated with Tableau Cloud schedules | Can be configured to refresh data sources as frequently as 15 and 30 minute increments |
| REST API | Not supported |
Manage schedules
Though the scheduling tasks are exactly the same, there are two primary entry points for setting up a Online schedule for a data source that connects to private network data. The first entry point is during the data source publishing process, from Tableau Desktop. The second entry point is at any time after the data source publishing process.
Note: Online schedules that use Bridge support the same scheduling frequency options as Online schedules that do not use Bridge.
Set up a schedule
In most cases, you will set up a schedule as you publish your data source from Tableau Desktop.
Note: Scheduled extracts of published data sources do not support multiple pools. Multiple pools may be necessary when you have a connection in a single data source to data sources that are located in two or more network locations.
-
In Tableau Desktop, create your data source.
-
Select Server > Publish Data Source to begin the publishing process. If you haven't already signed in to Tableau Cloud, you will be prompted to.
-
In the Publish Data Source to Tableau Cloud dialog box, configure the various options for your data source, and then click the Publish button. This opens a browser window to Tableau Cloud.
Note: Depending on the data that the data source is connected to or how you've configured the data source, the dialog will default to publishing an extract or will give you the option to publish an extract. If you are provided options, select the option to publish an extract.
-
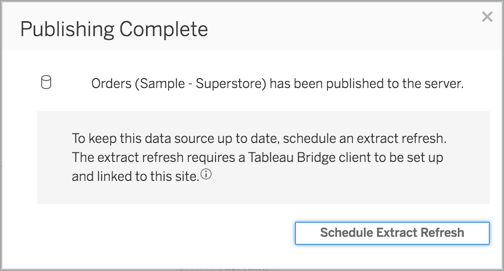
In the Publishing Complete dialog box, click the Schedule Extract Refresh button.
-
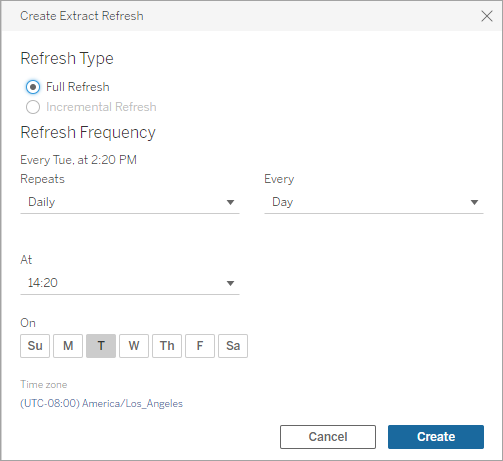
In the Create Extract Refresh dialog box, configure a schedule for the refresh. For more information about how to configure the schedule, see Schedule Refreshes on Tableau Cloud.
-
Click the Create button.
Add or update an existing schedule
For whatever reason you are unable to schedule a refresh during the data source publishing process, you can add a new or update a schedule anytime after.
-
Sign in to Tableau Cloud and navigate to your data source.
-
From the data source page, click the Extract Refreshes tab.
-
Do one of the following:
-
To set up a new schedule, click the New Extract Refresh button and configure a schedule for your refresh.
-
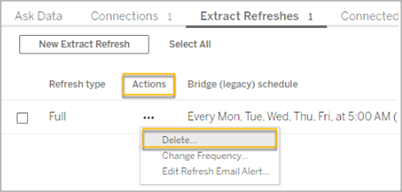
To update an existing schedule, select the check box next to the schedule, click the Actions menu, and then select Change Frequency to reconfigure the schedule for the refresh.
-
-
Click the Create button.
Change network connection type for a refresh of online schedules
By default, Tableau Cloud uses Bridge when a published data source has at least one public cloud and one on-premise connection.
For more information about how to edit the connection type, see Change the connection type of a refresh to use Tableau Cloud.
Alternative: Manage Bridge (legacy) schedules
Optionally, you can use the Bridge (legacy) schedule to keep your data fresh.
Notes:
-
Important: Support for Bridge (legacy) schedules will be removed in a future release. To ensure a smooth transition, we recommend you use Online refresh schedules.
- Bridge (legacy) schedules can only complete successfully if you embed your database credentials in the connection through the Bridge client. For more information, see Embed or update database credentials.
- When you use a Bridge (legacy) schedule, the time that shows on the client and the time that shows on Tableau Cloud correspond to the time zone of the machine from which the client is running.
Migrate from Bridge (legacy) to Online schedules
Refresh schedules for file-based data sources that were created before Bridge 2021.4.3 use Bridge (legacy) schedules by default. You can migrate Bridge (legacy) schedules to use Online schedules to keep your data fresh. Online schedules run on Bridge clients managed by your site admin and take advantage of pools of available clients to perform the refreshes.
- Ensure that you have a named pool with at least 1 client assigned to it and a domain specified for the pool. For more information, see Configure Pooling.
- Go to the published data source and click on the Extract Refreshes tab. You see Bridge (legacy) schedule listed.

-
Use the action menu to delete all legacy schedules.
-
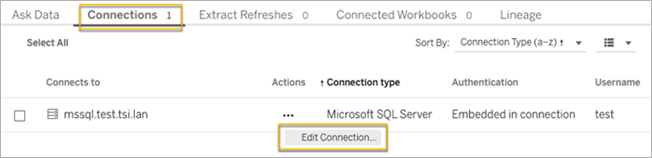
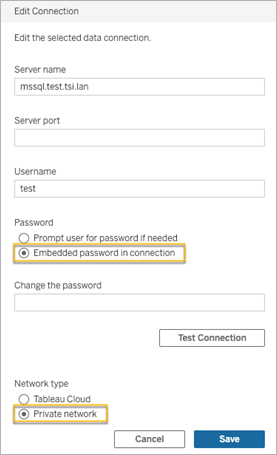
Go to the Connections tab and edit the connection. Provide the user name and password for the connection.
For legacy schedules, values persist on the server where the Bridge client is running. For online schedules, they persist in Tableau Cloud. For more information, see Set up schedules for private cloud-based data sources.
-
Before rescheduling the refresh, make sure Private network is specified as the network type.
-
Go to the Extract Refreshes tab and click New Extract Refresh to schedule a refresh for the named pool.
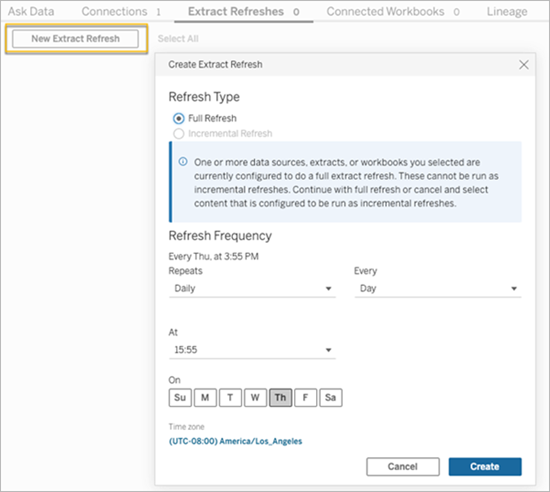
- Click Create to add the replacement scheduled refresh. The new schedule is listed as Schedule rather than Bridge (legacy) schedule.
Set up a Bridge (legacy) schedule
Just like with Online schedules workflow, in most cases, you will set up a Bridge (legacy) schedule as you publish your data source from Tableau Desktop.
-
In Tableau Desktop, create your data source.
- Select Server > Publish Data Source to begin the publishing process. If you haven't already signed in to Tableau Cloud, you will be prompted.
-
In the Publish Data Source to Tableau Cloud dialog box, configure the various options for your data source, and then click the Publish button. This opens a browser window to Tableau Cloud.
-
In the Publishing Complete dialog box, click the Schedule Extract Refresh button. The Create Extract Refresh dialog box, where you configure the Bridge (legacy) schedule, displays.
-
In the Create Extract Refresh dialog box, follow each step to configure the schedule.
Notes:
-
To refresh during a specific time period on selected days: Select Hourly, specify the time range during the day using the From and To drop-down lists, and then select the days of the week.
To optimize performance on the server, refresh tasks are distributed within a range of up to five minutes of the time of day you specify. For example, if you set an hourly schedule, the occurrence set to run at 1:00 AM could run any time between 1:00 and 1:05 AM.
-
Full or incremental refresh: If available, you specify whether you want a full or incremental refresh. By default, Tableau Cloud runs a full refresh. Incremental refresh is available only if you configured the data source for an incremental refresh in Tableau Desktop before publishing. For information, see Refreshing Extracts(Link opens in a new window) in the Tableau Help.
-
-
Click the Create button.
Add a new or update an existing Bridge (legacy) schedule
If you're unable to schedule a refresh during the data source publishing process, you can add a new or update a Bridge (legacy) schedule anytime after. New (for sites that have been migrated)
-
Sign in to Tableau Cloud and navigate to your data source.
-
From the data source page, click the Extract Refreshes tab.
-
Do one of the following:
-
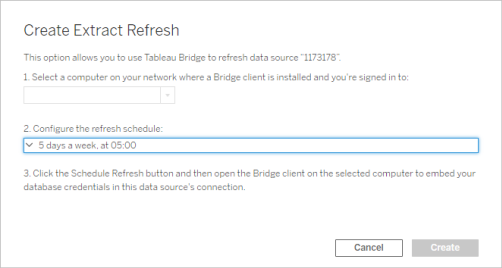
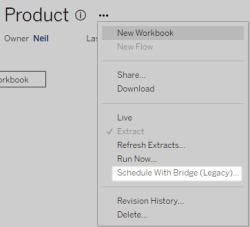
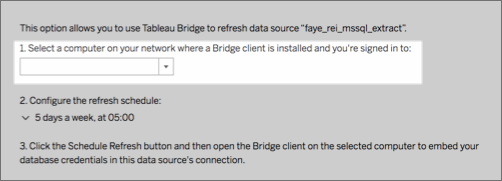
To set up a new Bridge (legacy) schedule, in the data source's actions menu, select Schedule with Bridge (Legacy), configure the schedule, and then click the Schedule Refresh button.
-
To update an existing Bridge (legacy) schedule, select the check box next to the existing schedule, click the data source's actions menu, and then select Change Schedule. In this workflow, you can't change the client that performs the refresh. If you need to change the client that performs the refresh, see Change the client that performs the Bridge (legacy) schedule. When finished, click the Change Schedule button.
-
Other Bridge (legacy) schedule management tasks
Add a new or update an existing schedule from the client
If you, not your site admin, are managing the "named" clients, you can add a new or update an existing Bridge (legacy) schedule directly from the Bridge client.
-
Open the Windows system tray and click the Bridge icon to open the client.
-
Hover over the data source and click the Schedule icon. This opens a browser window to the data source page in Tableau Cloud.
-
Repeat steps 2-3 from the above Add a new or update an existing Bridge (legacy) schedule section to set up the schedule.
Add a new computer (client) to perform a scheduled refresh
As part of the scheduling process, in the scheduling dialog, you must specify a machine. The machine you specify is the Bridge client that performs the refresh.
The Bridge (legacy) schedule displays the clients that you signed into.
If the client you want to select is not available from the drop-down list, it can be one of a few reasons:
- You're not signed in to the client.
- The client is not properly registered or connected to the site. Go to and open the client and make sure that it has a green or "Connected" status.
- Your site admin manages all clients in your organization. When using Bridge (legacy) schedules, the data source owner and the user signed into the client must be the same. If your site admin is signed into the client, he or she must reassign ownership of the data source to him or herself in order to schedule a refresh.
Cancel an in-progress refresh
In some cases, you might need to cancel an in-progress refresh. You can cancel a refresh for a data source that uses the Bridge (legacy) schedule only.
- Open the Windows system tray and click the Bridge icon to open the client.
-
Click the Cancel Refresh button. This action will cancel the in-progress refresh.
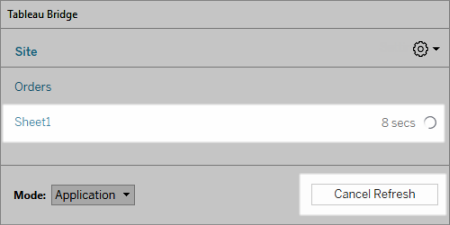
Note: A client can perform one Bridge (legacy) refresh at a time. If you need to run more than one Bridge (legacy) refresh at the same time, discuss with your site admin about setting up additional clients on different machines to perform the extract refreshes.
Change the client that performs the Bridge (legacy) schedule
If you're working with a Bridge (legacy) schedule and want to change the location or machine that performs the refresh, you must set up a new refresh schedule. You can only schedule a refresh using a client that you are signed in to.
To set up a new Bridge (legacy) schedule, see Set up a Bridge (legacy) schedule. When you're done setting up a new refresh schedule, make sure that you delete the previous schedule identical to the new schedule.
Important: If the data source requires database credentials to access the underlying data, you must go back to the client and edit the connection information to re-embed the database credentials. You can use the Test Connection option in the client to check whether the data source can access the underlying data.
Remove a client from a site
After you change the client that performs the Bridge (legacy) schedule, consider permanently removing the client from the site if it's no longer being used for any other data freshness tasks.
-
Sign in to Tableau Cloud.
-
In the upper-right corner of the browser, click your profile image or initials, and select My Account Settings.
- Under Connected clients, click Delete next to the client you want to remove from the site.
Verify a previous or upcoming refresh
You can check when a previous refresh took place or find out when the next refresh will occur.
-
Sign in to Tableau Cloud and navigate to your data source.
-
From the data source page, click the Extract Refreshes tab.
-
Next to the schedule, review Last update and Next update columns.
Delete a refresh schedule
-
Sign in to Tableau Cloud and navigate to the data source whose refresh schedule you want to delete.
-
On the data source page, click the Extract Refreshes tab.
-
Select the check box next to the schedule you want to delete and select Actions > Delete.