About Tableau Prep
Tableau Prep Builder is a tool in the Tableau product suite designed to make preparing your data easy and intuitive. Use Tableau Prep Builder to combine, shape, and clean your data for analysis in Tableau.
Note: Tableau Prep version 2019.1.2 had changed its name to Tableau Prep Builder and refers to the Desktop application. Starting in version 2020.4, as a Creator, you can also create and edit flows on Tableau Server(Link opens in a new window) and Tableau Cloud(Link opens in a new window).
Start by connecting to your data from a variety of files, servers, or Tableau extracts. Connect to and combine data from multiple data sources. Drag and drop or double-click to bring your tables into the flow pane, and then add flow steps where you can then use familiar operations such as filter, split, rename, pivot, join, union and more to clean and shape your data.
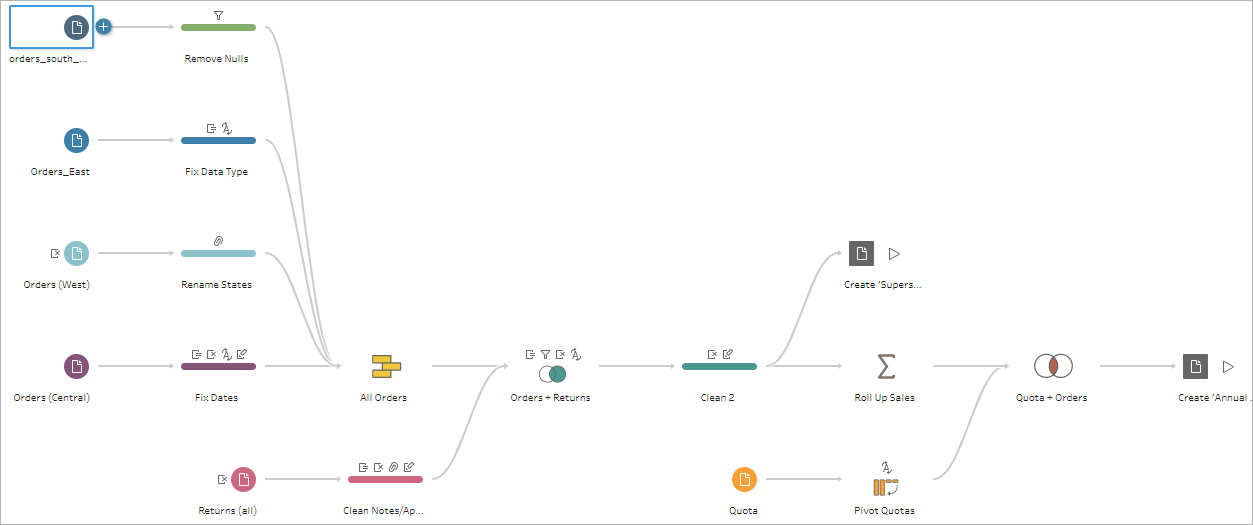
Each step in the process is represented visually in a flow chart that you create and control. Tableau Prep tracks each operation so that you can check your work and make changes at any point in the flow.
When you are finished with your flow, run it to apply the operations to the entire data set.
Tableau Prep works seamlessly with other Tableau products. At any point in your flow, you can create an extract of your data, publish your data source to Tableau Server or Tableau Cloud, publish your flow to Tableau Server or Tableau Cloud to continue editing on the web or refresh your data using a schedule. You can also open Tableau Desktop directly from within Tableau Prep Builder to preview your data.
For information about installing Tableau Prep Builder, see Install Tableau Desktop or Tableau Prep Builder(Link opens in a new window) in the Tableau Desktop and Tableau Prep Deployment Guide.
Ready to try it out? From the Start page, click on one of the sample flows to explore and experiment with the steps, try the Get Started with Tableau Prep Builder(Link opens in a new window) hands-on tutorial to learn how to create a flow or try stepping through one of our Day in the Life Scenarios using Tableau Prep Builder.
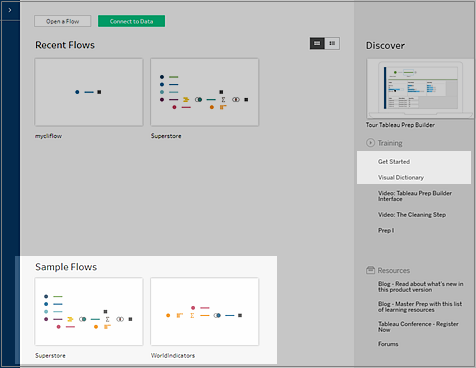
Note: You can find the sample data files used in the flows in these locations:
- (Windows)
C:\Program Files\Tableau\Tableau Prep Builder <version>\help\Samples\en_US - (Mac)
/Applications/Tableau Prep Builder <version>.app/Contents/help/Samples/en_US
To learn more about how Tableau Prep Builder optimizes your data for performance, see Tableau Prep under the hood(Link opens in a new window). To learn more about Tableau Prep and the different features and functions it offers, review the topics in this guide.
The Tableau Prep workspace consists of the Connections pane (1) where you connect to your data sources, and three coordinated areas that help you interact with and explore your data:
Flow pane (2): A visual representation of your operation steps as you prepare your data. This is where you add steps to build your flow.
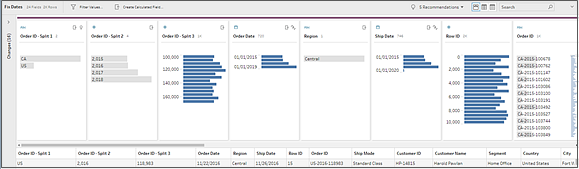
Profile pane (3): A summary of each field in your data sample. See the shape of your data and quickly find outliers and null values.
Data grid (4): The row level detail for your data.

After you connect to your data and begin building your flow, you add steps in the Flow pane. These steps function as a lens into the structure of your data, as well as a summary of operations that is applied to your data. Each step represents a different category of operations that you define, all as part of your flow.
See the Visual Dictionary(Link opens in a new window) for a look at the steps and icons used in Tableau Prep
Connections pane (1)
On the left side of the workspace is the Connections pane, which shows the databases and files you are connected to. Add connections to one or more data sources and then drag the tables you want to work with into the Flow pane. For more information see Connect to Data(Link opens in a new window).

You can minimize the Connections pane if you need more room in your workspace.
Flow pane (2)
At the top of the workspace is the Flow pane. This is where you'll build your flow. As you connect to, clean, shape, and combine your data, steps appear in the Flow pane and align from left to right along the top. These steps tell you what kind of operation is being applied, in what order, and how your data is affected by it. For example, the Join step shows you which join type you’ve applied, the join clauses, recommended join clauses, and the fields of the tables that are included in the join.
You start your flow by dragging tables into the Flow pane. Here you can add additional data sets, pivot your data, union or join data, create aggregations, and generate your flow output to a file (.hyper, .csv, .xlsx), published data source that you can use in Tableau, database or to CRM Analytics. For more information about generating output files, see Save and Share Your Work(Link opens in a new window).
Note: If you make changes to the data while in Tableau Desktop, for example renaming fields, changing data types, and so on, these changes aren’t written back to Tableau Prep Builder.
Profile pane (3)
In the center of the workspace is the Profile pane. The Profile pane shows you the structure of your data at any point in the flow. The structure of your data can be represented in different ways depending on the operation you want to perform on your data or the step that you select in the Flow pane.
At the top of the Profile pane is a toolbar that shows you the cleaning operations that you can perform for each step in your flow. An options menu also appears on each card in the Profile pane where you can select the different operations that you can perform on the data.
For example:
Search, sort, and split fields
Filter, include, or exclude values
Find and fix null values
Rename fields
Clean up data entry errors using group values or quick cleaning operations
Use automatic data parse to change data types
Rearrange the order of your field columns by dragging and dropping them where you want them
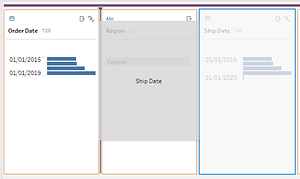
Select one or more field values in a Profile card and right-click or Ctrl-click (MacOS) to see additional options to keep or exclude values, group selected values or replace values with Null.
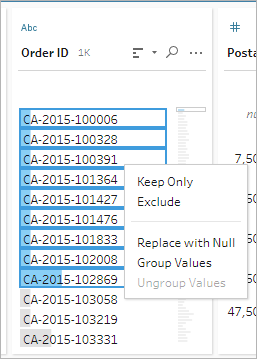
Tableau Prep keeps track of any changes you make, in the order you make them, so you can always go back and review or edit those changes if needed. Use drag and drop to re-order the operations in the list to experiment and apply changes in a different order.
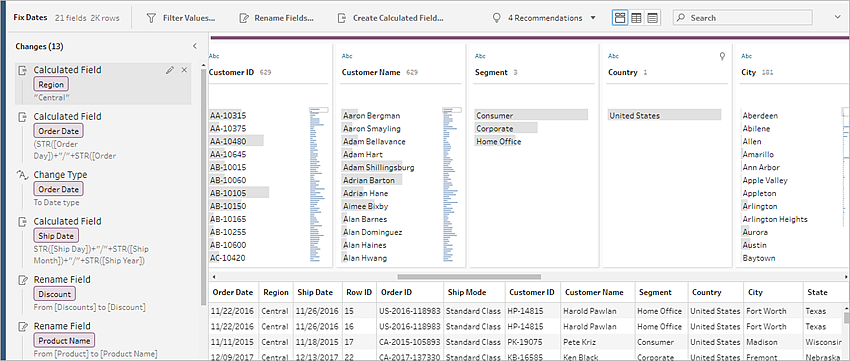
Click the arrow on the upper right of the pane to expand and collapse the Changes pane for more room to work with the data in the Profile pane.
For more information about applying cleaning operations to your data see Clean and Shape Data(Link opens in a new window).
Data grid (4)
At the bottom of the workspace is the Data grid, which shows you the row level detail in your data. The values displayed in the Data grid reflect the operations defined in the Profile pane. You can perform the same cleaning operations here as you can in the Profile pane if you prefer to work at a more detailed level.
Click the Collapse Profiles  icon on the toolbar to collapse (and expand) the Profile pane to see your options.

When you connect Tableau Prep to your data and create a flow, it stores the frequently used data in a .hyper file. For large data sets, this might be a sample of the data. Any stored data is saved under a secure temporary file directory in a file named Prep BuilderXXXXX, where XXXXX represents a universally unique identifier (UUID). After you save the flow, the file is deleted. For more information about how Tableau Prep samples your data, see Set your data sample size(Link opens in a new window).
Tableau Prep Builder also saves data in the Tableau flow (.tfl) file to support the following operations (which can capture entered data values):
Custom SQL used in Input steps
Filtering (on data entry)
Group Values (on data entry)
Calculations