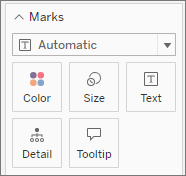
Show, Hide, and Format Mark Labels
You can add labels to the marks in your viz. Labels can display the data already represented in that mark, or additional fields can be added to the Label shelf on the Marks card.
Labels aren't quite the same thing as annotations (which are more like comments than labels). For more information on annotations, see Add Annotations.
Turn labels on or off
To show mark labels in a viz, do one of the following:
- Select the Mark Label button in the tool bar

- On the Marks card, select Label, and then select Show mark labels.
- Drag a field to the Label shelf on the Marks card.
Note: If the Mark type is Text (including Automatic text), the label shelf may say Text instead of Label.
To turn off labels, select the Mark Label button again or clear the Show mark labels option.
Use a specific field as a label
If you didn't specify what field to use as the label, Tableau will use a default field. To set a specific field as the label, drag the desired field to the Label shelf on the Marks card.
Change what labels appear
By default, all marks are labeled unless the labels would overlap. Overlap can often be illegible if there are too many marks nearby, but you can turn it on if you choose.
On the Marks card, click Label. Check the option Allow labels to overlap other marks.
Configure Marks to Label
The Marks to Label section offers more nuanced settings for what labels appear.
Not all options are available at all times. Some, like Line Ends, only appear when the structure of the viz supports it. The appearance of the dialog differs depending on if you're using Tableau Desktop or web editing in the browser.
| Label options in Tableau Desktop: All | Label option in Web Editing: Min/Max |
 | 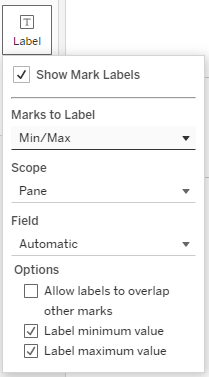 |
On the Marks card, click Label. Select an option:
- All. Label all marks in the viz. (This is the default)
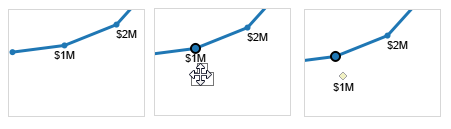
- Min/Max. Label only the minimum and maximum values for a field in the viz. Additional options appear with this setting:
- Scope: you can label the min/max for the entire table, per pane, per cell, or per line/pie.
- Field: set which field's min/max is used.
- Options: you can choose to label only the min or max or both.
- Line Ends. Label the ends of all lines. Use the Additional options if you want to label only the start or end.
- Selected. Labels appear when you select one or more marks in the viz.
- Highlighted. Label only the highlighted marks in the view. Highlighting can occur in several ways:
- Selecting a member in a legend
- Selecting a mark or marks in the viz (this is the same behavior as the Selected option)
- Using the Highlighter. For more information about how to use the Highlighter, see Highlight Data Points in Context.
- Most Recent. Label the most recent marks in the view. When there's a date field in the view, you can label all marks that correspond to the most recent date or time in the view. Like Min/Max, this setting has a scope option.
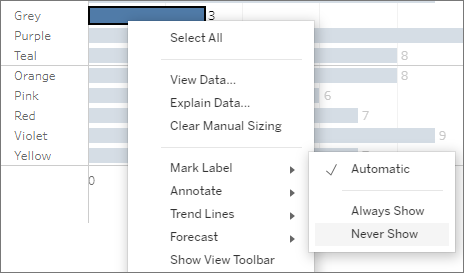
Show and hide individual mark labels
You might want to show labels for only individual marks, or hide specific overlapping mark labels.
In the viz, right click the mark you want to show or hide a mark label for, select Mark Label, and then select one of the following options:
- Automatic: select this option to turn the label on and off depending on the view and the settings in the Label drop-down menu.
- Always Show: select this option to show the mark label.
- Never Show: select this option to hide the mark label.
There are several formatting options to help you adjust the appearance of the labels. You can customize the text, adjust the font properties, and set an alignment. These options only available in Tableau Desktop.
Edit the label text
Note: A field must be on the Label shelf before you can edit the label text.
- On the Marks card, click Label.
- In the dialog box that opens, under Label Appearance, click the more options button [
 ] next to Text.
 - Edit the text.
- You can edit aspects of the font and alignment in this text editor, but for more complete options, use the Label dialog itself(see the next sections).
- You can use the Insert button in the editor to add more fields to the label, but only fields that were added to the Label shelf are available in that drop down.
- Select OK.
Edit the label font
- On the Marks card, click Label.
- In the dialog box that opens, under Label Appearance, click the Font drop-down. Here you can:
- Select a font type, size, and emphasis.
- Select a color for the labels:
- To select a specific color, click a color from the options.
- To match labels to the color of their marks, click Match Mark Color.
- Adjust the opacity of the labels by moving the slider at the bottom of the menu.
- On the Marks card, click Label.
- In the dialog box that opens, under Label Appearance, click the Alignment drop-down. Here you can:
- Align the label horizontally (left, center, right).
- Change the direction of the text.
- Align the label vertically (bottom, middle, top).
- Set the Wrap to automatic, on, or off.
Move mark labels manually
Once a label is present, you can drag it to a new position. For example, in a stacked bar chart, the mark labels are automatically placed in the center of each bar. However, you may want to stagger the labels so that the longer ones don’t overlap.
Select the mark label and, without releasing the mouse button, drag the label to its desired location.